Quarto Cheat Sheet (Previously Known as RMarkdown)
Have this cheat sheet at your fingertips
Download PDFWhat is Quarto?
Quarto is an open source publishing system for technical and scientific documents. You can mix text, code, and the output from code in a single document, and publish as a report, presentation, blog post, website or book. It is considered to be the next generation of R Markdown, and supports code in Python, R, Julia, and Observable JavaScript.
![]()
Quarto documents can be authored inside Jupyter Notebooks (.ipynb files), or IDEs like VS Code or RStudio, or any text editor. When using IDES or text editors, Quarto documents are created in .qmd files (a type of text file). For historical reasons, .Rmd R Markdown files can also be used for R documents.
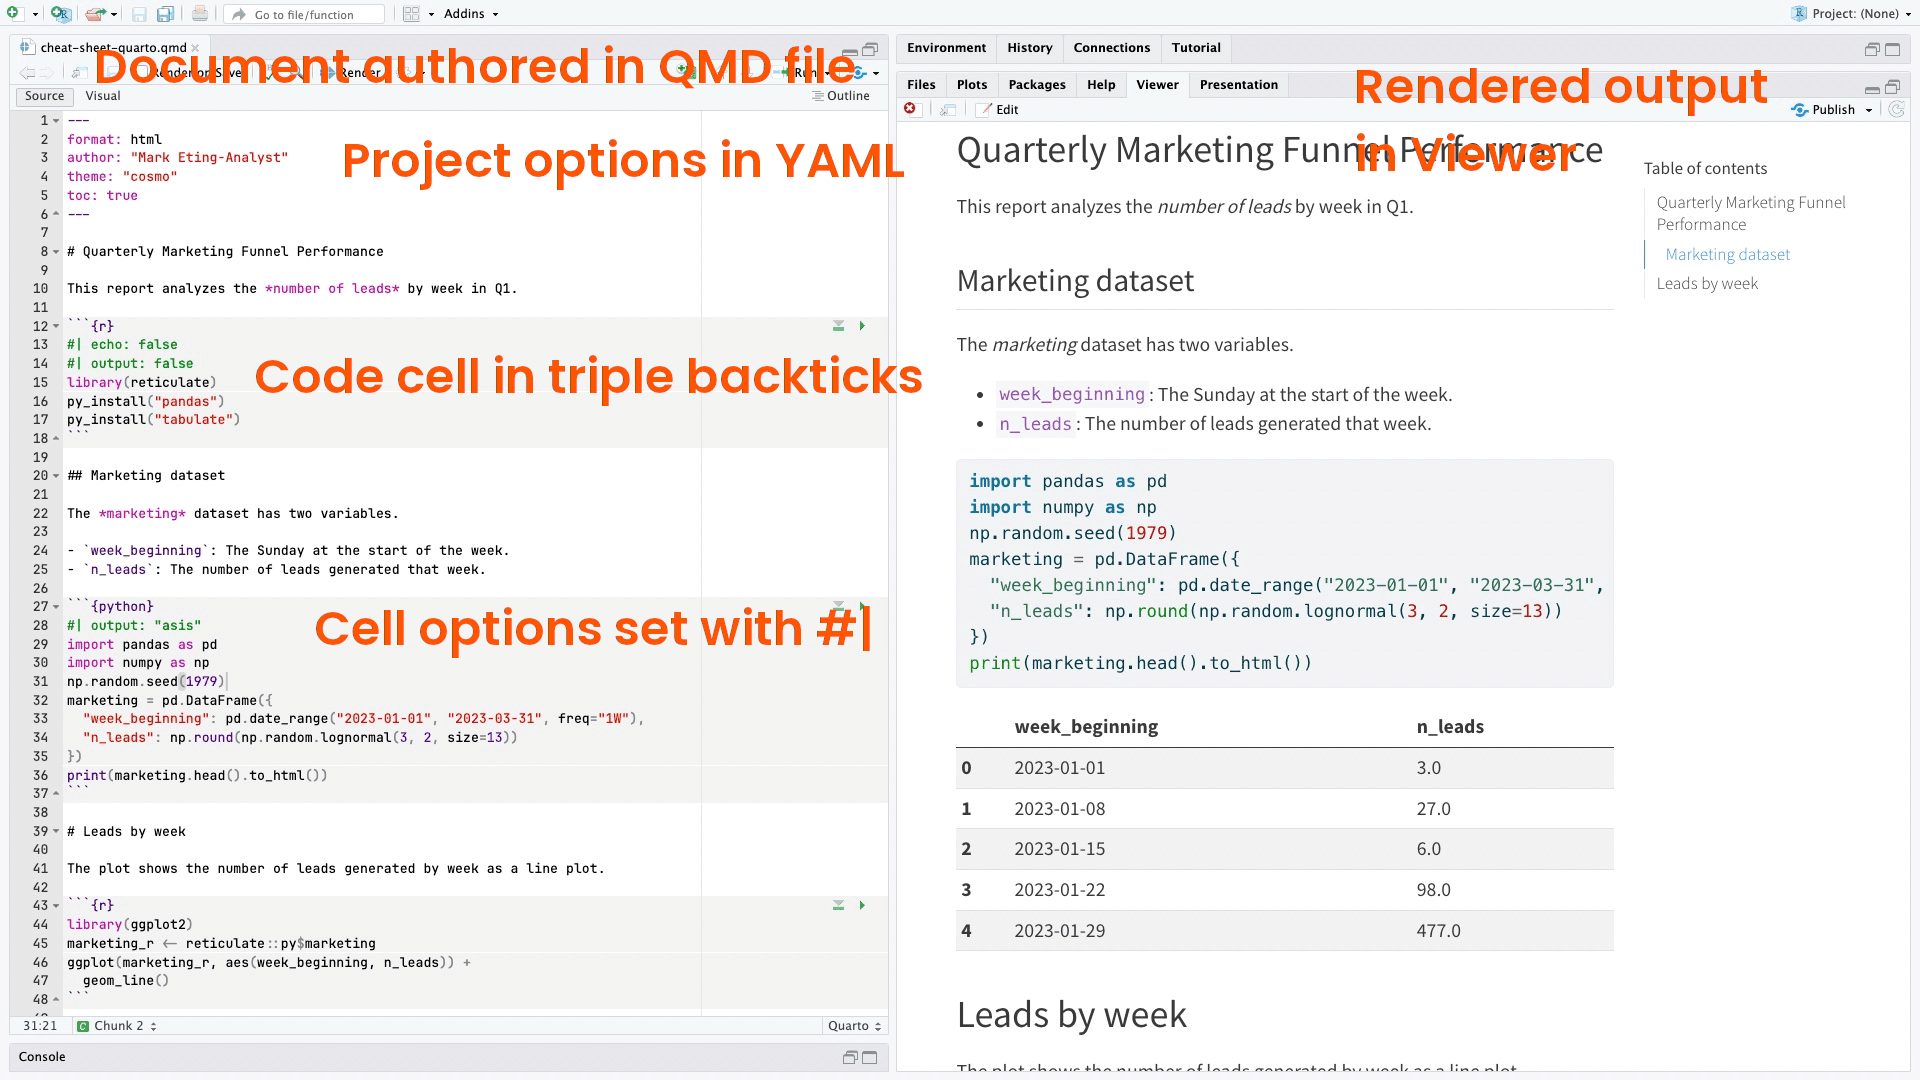
What Quarto Documents Look Like
Document options
Document options are defined using YAML. For .qmd files, this YAML should appear at the start of the text file. For Jupyter notebooks, the YAML should appear as the first cell, which should be a raw cell. The first and last lines of this cell consist of three hyphens (---). Elements are specified as key:value pairs, and sub-elements are indented. Below you will find a host of document options you can edit in quarto.
Project options
---
project:
  type: "default"      # ["default", "website", "book"] Type of output
  execute-dir: "file"  # ["file", "project"] Working directory for computations
  output-dir: "output" # Generate outputs (report, images, etc.) in this directory
---
Format options
---
format: pdf # ["html", "pdf", "docx", "odt", "pptx", "revealjs", "beamer", "gfm",
            # "commonmark", "mediawiki", "epub", "ipynb"] File format for the

            # rendered document
---
Notes on formats
There are many other output formats available than the ones listed in the comments above. The options available vary depending upon the format that is chosen. Where options are only supported for some formats, those formats are listed inside braces, to learn more about formats, check out the following documentation.
Title and Author
---
title: "Quarterly Marketing Funnel Performance" # Title of the document
date: "2023-12-25" # The date shown on the document
author: "Mark Eting-Analyst" # Author(s) of the document
subtitle: "Analysis of leads" # {html, pdf, odt, revealjs, beamer, epub} Subtitle of the document
abstract: |

  The leads went up 39%.

    # {html, pdf, odt, revealjs, beamer, epub}

    # A short summary of the document's contents
---
Styling
---
theme: "quartz" # {html, revealjs} ["default", "cerulean", "cosmo", ...] Name of a
                # built-in HTML Bootswatch theme, or link to a Sassy Cascading
                # Style Sheets (SCSS) file
pdf-engine: "tinytex" # {pdf, beamer} Toolchain for generating the PDF
reference-doc: "template.docx" # {docx, odt, pptx} Path to a file to use as a style reference
quarto-required: ">= 1.2.0"
---
Table of contents
---
toc: true # [false, true] Include a table of contents in the document
toc-depth: 2 # Least significant section header to include in table of contents
---
Section numbering
---
number-sections: true # [false, true] Should section headings be numbered?
number-depth: 2 # {html, pdf, docx, revealjs, beamer, epub} Least significant section header to be numbered
---
Slides
---
incremental: true # {pptx, revealjs, beamer} [false, true] Should list items be

                  # displayed one at a time or all at once?
slide-level: 2 # {pptx, revealjs, beamer} What header level denotes a new slide?
---
Fonts
---
mainfont: "Baskerville" # {html, pdf, beamer} Font family for regular text
monofont: "JetBrains Mono" # {html, pdf, beamer} Font family for code
# Specify font families with CSS or LaTeX, depending upon the output format
fontsize: 14 # {html, pdf, beamer} Set the base size of the font.
---
Colors
---
fontcolor: "#B06500" # {html} Color of text.
linkcolor: "#007FFF" # {html, pdf, beamer} Color of link text.
---
Layout
---
cap-location: "top" # {html, pdf, revealjs, beamer} ["top", "bottom", "margin"]
                    # Location of captions for figures and tables
papersize: "a4paper" # {pdf, beamer} LaTeX paper size for the rendered document
                    # Common values: letterpaper (USA), a4paper (rest of world)
page-width: 8 # {docx, odt} [6.5] Width of page in rendered document, in inches
margin-top: 20px # {html, pdf, revealjs, beamer} Top margin for the page
                # Specify either a CSS margin property, or a LaTeX margin
                # For other margins set margin-right, margin-bottom, margin-left
---
Code
---
code-line-numbers: true # {html, pdf, docx, revealjs, beamer, epub} [false, true]
                        # Should line numbers be included for code?
highlight-style: "breeze" # {html, pdf, docx, revealjs, beamer, epub} ["default",
                          # "a11y", "arrow", ...] Theme for code highlighting
code-fold: "show" # {html, revealjs, epub} [false, true, show] Should code be
                  # contained in a collapsible HTML <details> block?
                  # false: Don't put code in a collapsible block
                  # true: Put code in a collapsible block; start block collapsed
                  # "show": Put code in a collapsible block; start block expanded
code-overflow: "wrap" # {html, revealjs, epub} ["scroll", "wrap"] How should long
                      # lines of code behave?
---
Execution
These options are sub-elements of the execute element, though they can also be used at the top-level of the YAML.
---
eval: false # [true, false] Should code cells be evaluated?
echo: false # [true, false] Include cell source code in the rendered document?
output: "asis" # [true, false, "asis"] Include the results of executing the code in
              # the rendered document?
              # "asis": Include the results, treating them as raw Markdown
warning: false # [true, false] Display warnings in the rendered document?
error: false # [true, false] Display errors in the rendered document?
include: false # [true, false] Set echo, output, warning, and error together
cache: false # [true, false, "refresh"] Cache the results of computations so
            # repeated generation of the rendered document is faster
            # "refresh": Force a refresh, even when cache has not been invalidated
---
Figures
---
fig-width: 8 # Width for figures in inches
fig-height: 6 # Height for figures in inches
fig-format: "png" # File format for figures (Matplotlib or R graphics only)
fig-dpi: 300 # Figure resolution (Matplotlib or R graphics only) in dots per inch
fig-align: "center" # {html, pdf, docx, odt, revealjs, beamer, epub} ["default",
                    # "left", "right", "center"] Horizontal alignment of figures
fig-cap-location: "bottom" # {html, pdf, revealjs, beamer} ["top", "bottom",
                          # "margin"] Location of figure captions
---
Tables
---
tbl-colwidths: [70, 30] # ["auto", true, false, <array>] Should tables wider than
                        # 72 characters have explicit column widths?
                        # "auto": Use Markdown column widths unless the column
                        # contains a hyperlink
                        # true: Always use markdown column widths
                        # false: Never use markdown table widths
                        # <array>: Column widths as the %age of table width
tbl-cap-location: "margin" # {html, pdf, revealjs, beamer} ["top", "bottom",
                          # "margin"] Location of figure captions
---
Links
---
link-external-newwindow: true # {html, revealjs} [false, true] Open external pages
                              # in a new browser tab?
---
References
---
bibliography: "refs.bib" # Path to BibTeX/Citation Style Language bibliography file
---
Citation
---
# How to cite the document, specified in Citation Style Language format
citation:
  title: Language Models are Few-Shot Learners
  submitted: 2020-07-22
  publisher: arXiv
  doi = 10.48550/ARXIV.2005.14165
---
Footnotes
---
reference-location: "margin" # {html, pdf, revealjs, gfm, commonmark} ["block",
                            # "section", "margin", "document"] Footnote location
                            # block: End of current top-level block
                            # section: End of current section
                            # margin: At the margin
                            # document: End of document
---
Language
---
lang: "fr-CA" # Main language for document in IETF language tag format
---
Metadata
---
keywords: ["data", "marketing"] # {html, pdf, revealjs, beamer} List of keywords
---
Rendering
---
template: "tmplt.html" # {html, pdf, odt, revealjs, beamer, gfm, commonmark,
                      # mediawiki, epub} Path to HTML/LaTeX template to override
                      # the document structure or content
template-partial: "tmpltp.html" # {html, pdf, odt, revealjs, beamer, gfm,
                                # commonmark, mediawiki, epub} Path to HTML/LaTeX
                                # template to override parts of document
---
Code cells
Including code cells
Code can be included in documents. The method depends on the authoring file format. For Jupyter notebooks, add a code cell. For .qmd files, create a code block using three backticks, and name the programming language in braces. Supported languages are Python, R, Julia, and OJS (Observable JavaScript). Here is an example of adding a python code block in a .qmd file below.
```{python}

```
Code cell options
Cells can be given options, similar to those provided in the YAML header for document options.
- Cell options are comment lines containing a name:value pair.
- For Python, R, and Julia, the lines begin with #|
- For Observable JavaScript, the lines begin with //|
- This is different from R Markdown! Do not add cell options inside the braces.
```{python}
#| name: value
```
```{ojs}
//| name: value
```Notes on cell options
- For a given format, most of the document-level options for Code, Execution, Figures, and Tables are available at the cell level. When provided for that cell, they will override the document-level option for that cell only.
- Additional cell-level options are described below.
Attributes
---
label: "import-df" # ID label for the cell, for cross-references
classes: "banner" # Apply HTML/LaTeX classes to the cell, allowing for style rules
---
Page columns
---
column: "page" # ["body", ...] Limit output to the
              # width of the page body or let it overflow to margins
              # body: Output limited to the width of the document body column
              # body-outset: Slightly wider than the body column
              # page: Output is limited to the width of the document page
              # screen-inset: Output is slightly less than the screen width
              # screen: Output is the width of the screen
              # margin: Output is contained in the document margin
---
Generating the document
Creating a preview
While authoring your document, use the preview to quickly see its current state. The generated preview will open in a browser. Consider having your Jupyter notebook, IDE, or text editor and the preview visible on-screen at the same time.
- Open a terminal
- Type quarto preview {document_filename}
To update the preview:
- Change the contents of some cells.
- Rerun those cells.
- Save the notebook or .qmd file.
Rendering the document
Once you have finished authoring your document, you can render the final version.
- Open a terminal
- Type quarto render {document_filename}
This will create rendered documents in the file formats specified in the YAML header. To override the file format, use the following command variant:
quarto render {document_filename} --to {format}
Some IDEs have shortcuts for rendering the document. In RStudio, or VS Code with the Quarto VS Code Extension, type Ctrl+Shift+K (Windows) or Cmd+Shift+K (macOS) to render the output document.
cheat sheet
Jupyter Notebook Cheat Sheet

Karlijn Willems
2 min
cheat sheet
Markdown Cheat Sheet

Richie Cotton
cheat sheet
The data.table R Package Cheat Sheet
Karlijn Willems
7 min
cheat sheet
ggplot2 Cheat Sheet
Richie Cotton
tutorial
R Markdown Tutorial for Beginners

Elena Kosourova
12 min
tutorial
The data.table R Package Cheat Sheet
Karlijn Willems
2 min