Certification available
course
Software Engineering Principles in Python
4 hours
41.4K

Imagine you’ve worked on an end-to-end machine learning problem and arrived at the optimum solution with the best models. However, when you ship your code to the engineering team, the code that worked on your machine doesn’t seem to work on the their servers, which may have a different operating system with varying library versions.
Despite your diligence and hard work, this frustrating occurrence can sometimes happen.Most developers experience this at least once. So what’s the solution? That’s where Docker comes in. Using Docker, you can define a precise and consistent environment for your project, ensuring that your code will run smoothly, regardless of the underlying environment or setup.
This tutorial will introduce Docker and its related concepts and explain its importance for data scientists. Further, this article will help you install the tool and help you use it for your next project with examples. Finally — you’ll learn the industry-wide best practices to follow while using Docker and have all your Docker-related questions answered.
Docker is a platform for building, running, and shipping applications.
Containers are lightweight, standalone, executable packages that contain everything needed to run an application, including the code, a runtime, libraries, environment variables, and config files.
A Docker Image is a read-only file that contains all the necessary instructions for creating a container. They are used to create and start new containers at runtime.
Docker helps developers to package their applications together with the dependencies into a container, which can then run on any machine that has Docker installed.
In a sense, it’s like you’ve been given a new machine for a new project. You’d install the required packages, copy the required files to the machine and run the scripts. You can also ship this new machine else. It’s a toned-down example, but you get the point.
As soon as we defined containers, you’d wonder how it differs from virtual machines, as both technologies allow multiple isolated environments to run on the same physical machine.
Have a look at the architectural difference in the image below and see if you can spot the difference.
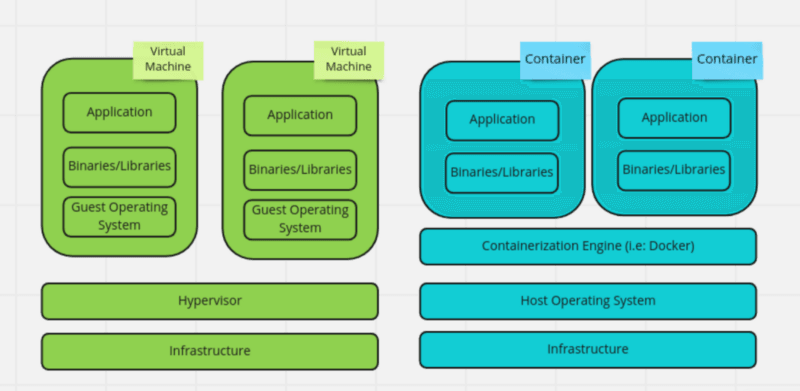
Image by the author
Each virtual machine is an isolated environment that can run different operating systems and configurations. It also means that each VM requires a full copy of the operating system, which can consume many resources. Containerized application, on the other hand, runs in an isolated environment without requiring a full copy of the operating system, which makes them more lightweight and efficient.
While virtual machines are useful, containers are generally sufficient and ideal for shipping applications.
You probably are wondering why you should learn Docker as a data scientist. Aren’t there the DevOps teams to take care of the infrastructure side of things?
Fair question — but docker is extremely important for data scientists, even if there’s a DevOps team. Let’s understand why Docker is so useful.
Having a DevOps team does not negate the benefits of using Docker; it can also help to bridge the gap between development and operations teams. Data scientists can use Docker to package their code and pass it to the DevOps team for deployment and scaling. You’re likely to experience this in a more structured data science team.
Data scientists often work with complex dependencies and configurations that must be set up and maintained. The environment must remain the same to obtain similar results. Docker allows data scientists to create and share a consistent environment with all the necessary dependencies and configurations pre-installed, which others can easily replicate.
Docker containers can run on any environment with Docker installed, including laptops, servers, and cloud platforms. This makes it easy for data scientists to move their work between different environments.
Docker allows multiple containers to run on the same machine, each with its own isolated resources. This can help data scientists to manage their resources more efficiently and avoid conflicts with other applications. When you have multiple ML projects, this feature can be a lifesaver.
Docker allows data scientists to share their work with anyone, including remote teams, in containers. Collaboration is a crucial part of working as a team for data scientists, and Docker reduces the friction in doing so.
Most seasoned data scientists would agree that with the help of Docker, data scientists can focus on their work without worrying about the underlying infrastructure.
Since we’ve established the need for Docker for a data scientist, let’s waste no time getting up to speed with Docker. First, we must install Docker on our machine and familiarize ourselves with common commands.
Docker is available for all major operating systems, such as Linux, Windows, and Mac. The installation is straightforward and best found in the official documentation.
If you’d like to create your own images and push them to Docker Hub (as shown in some of the below commands), you must create an account on Docker Hub. Think of Docker Hub as a central place where developers can store and share their Docker images.
Once you have set up the Docker in your machine (or server), the next step is to get familiarized with some Docker commands. Here’s the list of commands you should refer to from the official Docker documentation.
To help you get started, we’ve outlined the ten most commonly used Docker commands you’re sure to encounter.
docker run -p 80:80 nginxdocker psdocker stop <container_id>docker rm <container_id>docker imagesdocker rmi <image_id>docker build -t my_image .docker exec -it <container_id> /bin/bashdocker pull <image_name>docker push <image_name>Now that we have learned to set up Docker and the common commands, our next goal is to dockerize a machine learning application.
Dockerizing any machine learning application is easier than you think if you follow a simple three-step approach.
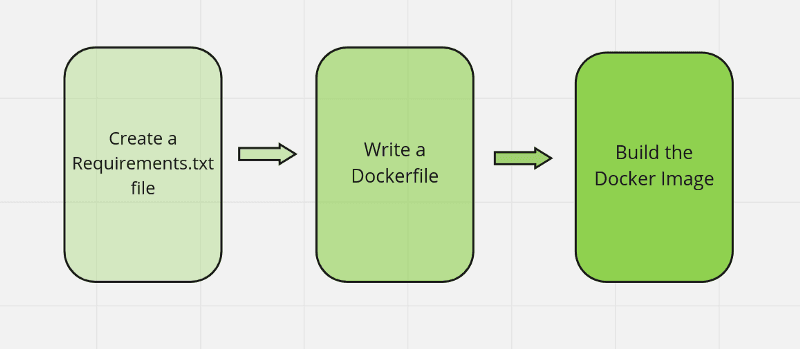
Image by the author.
Let’s take a beginner-level machine learning script to keep things simple, as our objective is to demonstrate how you could go on to dockerize a script. The example we would see builds a simple logistic regression model on the iris dataset.
# Load the libraries

from sklearn.datasets import load_iris

from sklearn.model_selection import train_test_split

from sklearn.linear_model import LogisticRegression

from sklearn.metrics import accuracy_score


# Load the iris dataset

iris = load_iris()

X = iris.data

y = iris.target


# Split the data

X_train, X_test, y_train, y_test = train_test_split(X, y, test_size=0.2)


# Train a logistic regression model

clf = LogisticRegression()

clf.fit(X_train, y_train)


# Make predictions

y_pred = clf.predict(X_test)


# Print the accuracy of the model

accuracy_score = accuracy_score(y_test, y_pred)

print(f'Accuracy: {accuracy_score}')You need to know precisely the current environment to be able to replicate it in another location. The easiest (and the most common) way is to create requirements.txt file that outlines all the libraries your project is using, including their versions.
Here’s how the content of the file looks like:
scikit-learn==1.2.0
Note: A more complex machine learning application would utilize more libraries such as NumPy, pandas, matplotlib and others. Thus creating a requirements.txt file would make more sense instead of simply installing the library (more on this under the industry best practices later.)
Our next step is to create a file named Dockerfile that can create the environment and executes our application in it. In simpler terms, it’s like our instruction manual to Docker, mentioning what the environment should be, the contents, and other execution steps.
FROM python:3.9

WORKDIR /src

COPY requirements.txt .

RUN pip install --no-cache-dir -r requirements.txt

COPY . .

CMD ["python","iris_classification.py"]
This Dockerfile uses the official Python image as the base image, sets the working directory, copies the requirements.txt file, and installs the dependencies, copies the application code, and runs the python iris_classification.py command to start the application.
The final step to create a reproducible environment is to create an image (also known as a template) which can be run to create any number of containers with the same configurations.
You can build the image by running the command docker build -t <image-name> . in the same directory where the Dockerfile is located.
Now that you have dockerized the simple machine learning application we saw, you can use the docker run command, create containers, and then stop them as required. We already covered some common commands earlier.
Let’s now transform our knowledge from basics to industry expectations.
While understanding the basics is sufficient to get started, as you work in the industry, it’s vital to follow the best practices.
Each instruction in the Dockerfile results in a new layer. Too many layers can make the image large and slow to transfer.
Have a look at the code sample below:
# Use the official Python image as the build image

FROM python:3.9


# Install the dependencies

RUN pip install pandas

RUN pip install matplotlib

RUN pip install seaborn


# Copy neccesary files

COPY my_script.py .

COPY data/ .


# Run the script

CMD ["python","my_script.py"]
What problem do you see here? The use of several run and copy commands were unnecessary. Here’s how we could fix it:
# Use the official Python image as the build image

FROM python:3.9


# Install the dependencies using requirements.txt

COPY my_script.py requirements.txt data/ .

RUN pip install --no-cache-dir -r requirements.txt


# Run the script

CMD ["python","my_script.py"]
While it’s evident in a small file like this, you’d be surprised how often we write bigger Dockerfiles than we need to. Grouping commands that do similar functions or alter the same file is an easy way to reduce the layers in a Dockerfile.
Official images are images that are maintained and supported by the image publisher. These images are generally considered to be more stable and secure than other images.
Sometimes in a hurry to get work done quicker, we carelessly use an unofficial image. When possible, use official images as the base for your own images.
A multi-stage build in Docker allows you to use multiple FROM instructions in a single Dockerfile.
We may use a larger image as a build image for building the application and then copy the necessary files to a smaller runtime image. By not including unnecessary files, we reduce the size of the final image, not only optimizing the performance but also making the application more secure.
Let’s look at an example to understand this better, as it gets repeatedly used in the industry:
# Use the official Python image as the build image

FROM python:3.9 AS build

# Set the working directory

WORKDIR /app

# Copy the requirements.txt file

COPY requirements.txt ./

# Install the dependencies

RUN pip install --no-cache-dir -r requirements.txt

# Copy the application files

COPY . .

# Train the model

RUN python train.py

# Use the official Alpine Linux image as the runtime image

FROM alpine:3

# Set the working directory

WORKDIR /app

# Copy the model files from the build image

COPY --from=build /app/models /app/models

# Copy the requirements.txt file

COPY --from=build /app/requirements.txt /app

# Install the dependencies

RUN pip install --no-cache-dir -r requirements.txt

# Run the application

CMD ["python","predict.py"]
Dissecting this example, the official Python image is used initially as the build image and installing all the dependencies in that stage.
After running the train.py file, we copy the generated model files and the requirements.txt file to a smaller Alpine Linux image for runtime, which we’ll use to run the application. By utilizing a multi-stage build and not including build dependencies and the Python interpreter in the final image, we have effectively made the final image size much smaller.
Data within a container isn’t available once it’s stopped and deleted, but sometimes you require the results of the experiments for later reference. It also could be that you want to share data between several containers.
By using the volume command, you ensure that the data is persisted outside the container. Here’s an example of how you could do it:
# Use the official Python image as the base image

FROM python:3.9

# Set the working directory

WORKDIR /app

# Copy the requirements.txt file

COPY requirements.txt ./

# Install the dependencies

RUN pip install --no-cache-dir -r requirements.txt

# Copy the rest of the application files

COPY . .

# Create a directory for storing data

RUN mkdir /app/data


# Define a volume for the data directory

VOLUME /app/data

# Run the application

CMD ["python","main.py"]Once you start working with multiple Docker images, it becomes messy, and the need to organize them arises. While these practices vary from organization to organization, we can outline some commonly followed practices around organizing Docker images:
It’s recommended to align with your organization; the entire team is expected to follow the same convention.
This article covered the importance of creating codes and applications that are reproducible using tools, such as Docker, for data scientists. Starting from outlining the importance of Docker for data scientists to instructions for installation to some commonly used Docker commands. Later the article covered how we can dockerize machine learning applications through sample codes and the industry-wide best practices to be followed when using Docker.
For further learning, you can take our Introduction to Docker course, which covers many of the essentials. You may also want to think about persuing a Docker certification if you're working in the field.
Most data scientists focus on core skills subjects like statistics, mathematics, machine learning, deep learning, and coding but forget to learn the software engineering best practices that are expected to be followed in the industry.
If you want to solidify your learning on core data science, check out the Data Scientist with Python track that aids guided learning with projects. Alternatively, if you need to brush up on your software engineering skills, check out the software engineering for data scientists with Python course, which covers essential concepts such as modularity, documentation, and automated testing.
Top Courses
course
course
course
blog
Matt Crabtree
8 min
cheat sheet
Richie Cotton
5 min
tutorial
Bex Tuychiev
12 min
tutorial
Moez Ali
10 min
tutorial
Alexis Perrier
16 min
tutorial
Javier Canales Luna
7 min