Introduction to DynamoDB: Mastering NoSQL Database with Node.js | A Beginner's Tutorial


In today's data-driven world, the need for scalable, high-performance, and highly available databases is greater than ever. Amazon DynamoDB, a fully managed, serverless, wide-column key-value store provided by AWS (Amazon Web Services), is designed to meet these demands. Whether you're building a web application, mobile app, or any system that requires flexible and reliable storage, DynamoDB has you covered.
This tutorial aims to introduce you to the world of Amazon DynamoDB and demonstrate how to use it effectively in Node.js applications. Whether you're a beginner just starting with NoSQL databases or an experienced developer looking to expand your skill set, this guide will walk you through the essentials and provide practical examples to help you get started.
What is DynamoDB?
Amazon DynamoDB is a serverless, key-value and document database that offers seamless scalability and low-latency performance. Unlike traditional relational databases, DynamoDB doesn't require you to provision hardware or manage infrastructure, making it an ideal choice for applications that need to scale up or down dynamically in response to changing workloads.
Key features of DynamoDB include:
Scalability
DynamoDB can handle millions of requests per second, making it suitable for applications with varying levels of traffic.
High availability
Designed for high availability and data durability with built-in replication across multiple availability zones.
Managed service
AWS takes care of the operational overhead, including hardware provisioning, patching, and backups, allowing you to focus on building your application.
Flexible data model
DynamoDB supports both key-value and document data models, providing flexibility in how you structure your data.
Security
AWS Identity and Access Management (IAM) integration enables fine grained secure access control to your database resources at item and attribute level.
Cost savings
DynamoDB's serverless architecture, coupled with its automatic scaling capabilities, allows you to optimize costs by paying only for the resources you consume. There are no upfront hardware costs or long-term commitments, making it a cost-effective choice for startups and enterprises alike.
Data types
Supported data types in DynamoDB:
- Scalar types: These include strings, numbers, binaries, booleans, and null values.
- Document types: DynamoDB accommodates complex structures with nested attributes, making it perfect for handling JSON data.
- Set types: String sets, number sets, and binary sets enable you to store collections of related values efficiently.
Why use DynamoDB with Node.js?
Node.js is a popular runtime environment for building server-side applications, including web servers and APIs. Its non-blocking, event-driven architecture pairs well with DynamoDB's asynchronous API, making it a natural choice for Node.js developers.
In this tutorial, we will cover the following topics:
1. Creating tables and defining a schema in DynamoDB.
2. Performing basic CRUD (Create, Read, Update, Delete) operations using the AWS SDK for Node.js.
3. Advanced querying with ACID compliance.
By the end of this tutorial, you will have a solid understanding of Amazon DynamoDB and how to harness its power within your Node.js applications. So, let's dive in and unlock the potential of this versatile NoSQL database!
Preparation
Before we start, you’re going to need an AWS account. We could do all of this without an AWS account, but for a more realistic example, we are going to use terraform to create our infrastructure in AWS. For more information about how to work with AWS services locally using Docker I have an example demo localstack github repository you can refer to and experiment with.
Now is also the time to install terraform if you don’t have that already.
The remainder of this tutorial will assume you have set up the AWS CLI with your credentials and config files in place and that you have terraform installed.
Getting Started
For this tutorial we are going to use typescript and yarn. For this tutorial we will start simple by using ts-node and then in the next tutorial we will go serverless and expand on this by using AWS Lambda.
To setup our demo project, create a new folder and then add the following dependencies and setup by running:
yarn init
yarn add --dev typescript ts-node @types/node @types/ramda @types/uuid
yarn add @aws-sdk/client-dynamodb ramda uuid
npx tsc --init
mkdir src src/domain infra
touch ./src/index.ts ./src/client.ts ./infra/main.tf ./src/domain/student.ts
Next add the following scripts section to package.json
  "scripts": {
    "dev": "ts-node src/index.ts"
  },
main.tf
provider "aws" {
  region = "eu-west-1"
}


resource "aws_dynamodb_table" "demo-table" {
  name = "demo-table"
  billing_mode = "PAY_PER_REQUEST"
  hash_key = "pk"
  range_key = "sk"


  attribute {
    name = "pk"
    type = "S"
  }


  attribute {
    name = "sk"
    type = "S"
  }
}
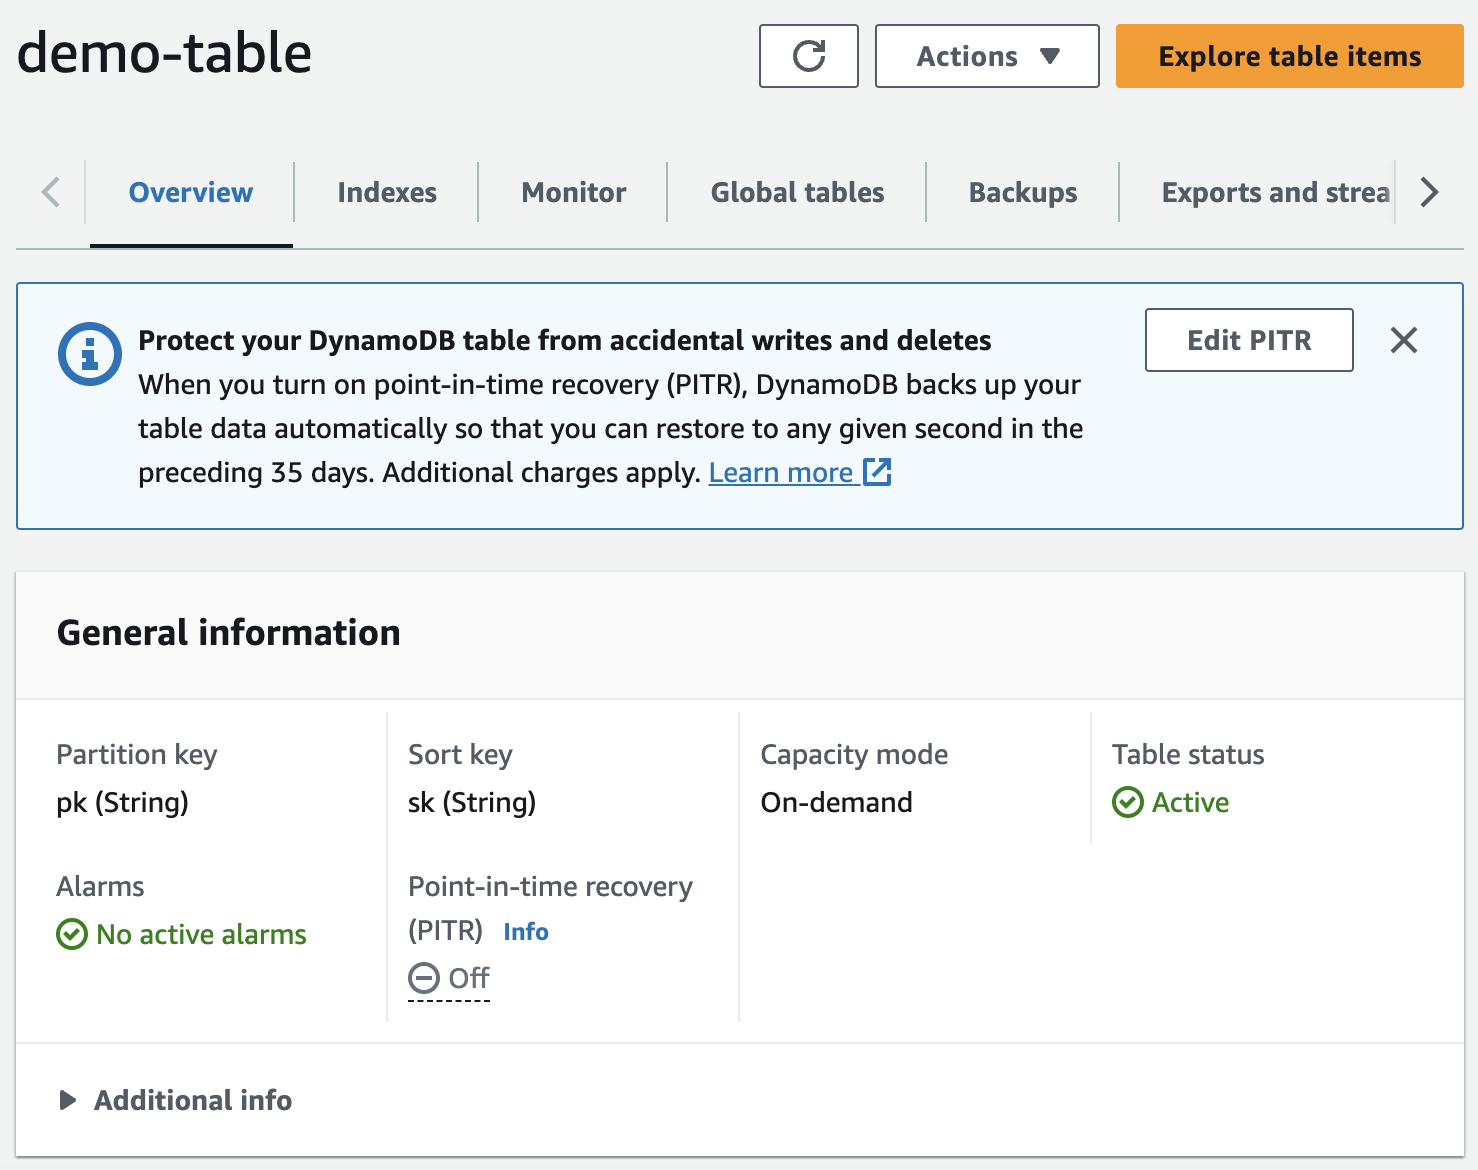
From the command line cd into the infra directory and run terraform init && terraform apply -auto-approve and then go to the AWS console and view your DynamoDB table:
I will cover DynamoDB billing modes, WCUs, RCUs in a separate article
client.ts
import { DynamoDB } from "@aws-sdk/client-dynamodb";


export const TABLE_NAME = "demo-table";
export const REGION = "eu-west-1";
export const dynamoClient = new DynamoDB({ region: REGION });


export const STUDENT_PREFIX = "student#";
Data Model
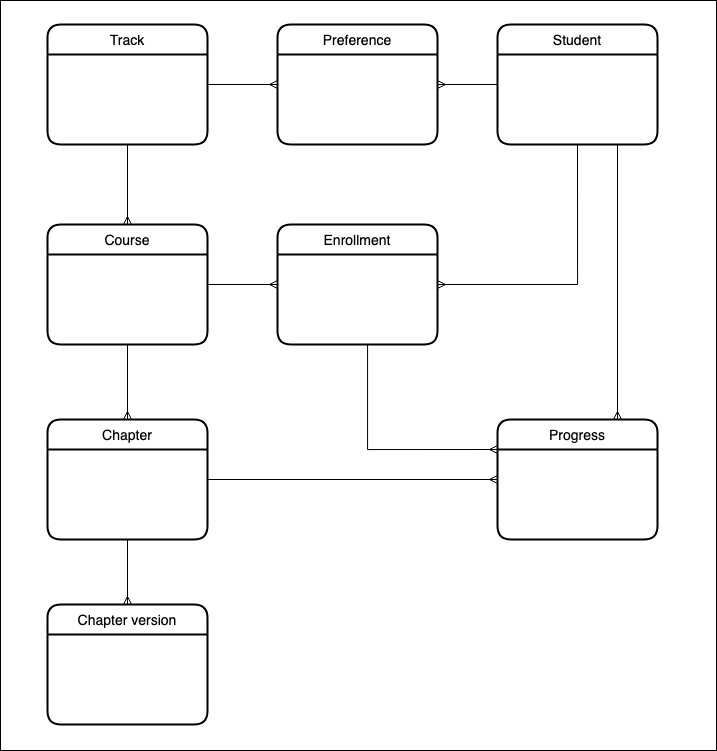
Before we go any further let’s define a data model that we can use for the scope of this tutorial. To keep things in context I’ve chosen to model something close to the core features of DataCamp.
This tutorial won’t cover all of the entities. I will expand on this model in subsequent articles.
CRUD Operations With DynamoDB
To get a full understanding of how to design and model data with DynamoDB see my tutorial on single table design with DynamoDB. For this tutorial, I will try to keep the explanation as to how DynamoDB works to a minimum. The key thing to remember is that DynamoDB uses partition keys and sort keys for efficient data management.
Partition keys
Partition keys are used to distribute data across multiple storage servers. It is important to choose a partition key that evenly distributes your data to avoid "hot partitions" (uneven data distribution) which can lead to performance issues.
Common choices for partition keys that help to evenly distribute data include high-cardinality attributes such as:
- unique IDs
- user IDs
- hash values
- geographic regions
- time based keys
- composite keys
The choice of partition key will greatly depend on the applications’ access patterns and data model.
Sort keys
Sort keys are optional and allow you to organize data within a partition. Use sort keys for efficient querying and sorting of data within a partition.
Composite keys
Composite keys consist of both partition and sort keys. They allow you to create rich query patterns, such as filtering by range, time, or other attributes. Use composite keys when your data access patterns require complex queries.
Hot partitions
To mitigate hot partitions, consider strategies like sharding (using random prefixes for partition keys), time-based partitioning, or distributing writes evenly. Monitor and use AWS Auto Scaling to adjust capacity dynamically.
student.ts
We are going to keep things simple and use the student ID as both the partition key and sort key. This might seem like a strange choice but we need to keep our schema flexible and ready to support various data relationships and access patterns. I will expand on this model in subsequent DynamoDB articles.
import { head, omit, pathOr } from "ramda";
import { STUDENT_PREFIX, TABLE_NAME, dynamoClient as client } from "../client";
import { v4 as uuidv4 } from "uuid";
import {
  addPrefix,
  attributeMapToValues,
  attributeValueToValue,
  removePrefix,
  valueToAttributeValue,
} from "../utils";


const entityType = "student";


export const dynamoRecordToStudent = (record: any) => {
  const { pk, ...data } = record;


  return omit(["sk"], {
    ...attributeMapToValues(data),
    id: removePrefix(attributeValueToValue<string>(pk), STUDENT_PREFIX),
  });
};


export const getStudentById = (id: string) =>
  client
    .getItem({
      TableName: TABLE_NAME,
      Key: {
      pk: valueToAttributeValue(addPrefix(id, STUDENT_PREFIX)),
      sk: valueToAttributeValue(addPrefix(id, STUDENT_PREFIX)),
    },
  })
  .then(({ Item }) => (Item ? dynamoRecordToStudent(Item) : undefined));


export const saveStudent = async ({
  firstName,
  lastName,
  email,
}: {
  firstName: string;
  lastName: string;
  email: string;
}): Promise<string> => {
  const _id = uuidv4();
  const _email = email.toLocaleLowerCase();
  const xp = 0;


  await client.putItem({
    TableName: TABLE_NAME,
    Item: {
      pk: valueToAttributeValue(addPrefix(_id, STUDENT_PREFIX)),
      sk: valueToAttributeValue(addPrefix(_id, STUDENT_PREFIX)),
      firstName: valueToAttributeValue(firstName),
      lastName: valueToAttributeValue(lastName),
      email: valueToAttributeValue(_email),
      xp: valueToAttributeValue(xp),
      entityType: valueToAttributeValue(entityType),
    },
  });


  return _id;
};
utils.ts
The latest DynamoDB SDK from AWS has increased the type safety for items stored within the database but in doing so has made working with it a little more difficult. To ease this pain let’s create some helper functions. It will become clear as to why we need them a little bit later when we see how DynamoDB stores data internally.
Create a new file in the root of the src folder named utils.ts.
import { AttributeValue } from "@aws-sdk/client-dynamodb";


export const valueToAttributeValue = <T>(value: T): AttributeValue => {
  switch (typeof value) {
    case "string":
      return { S: value };
    case "number":
      return { N: `${value}` };
    case "boolean":
      return { BOOL: value };
    case "object":
      if (Array.isArray(value)) {
        return { L: value.map((item) => valueToAttributeValue(item)) };
      }
      return {
        M: Object.entries(value as any).reduce(
          (acc, [key, item]) => ({
            ...acc,
            [key]: valueToAttributeValue(item),
          }),
          {}
        ),
      };
    default:
      throw new Error(`Unknown type ${typeof value}`);
  }
};


export const attributeValueToValue = <T>(value: AttributeValue): T => {
  switch (true) {
    case !!value.S:
      return value.S as T;
    case !!value.N:
      return Number(value.N) as T;
    case !!value.BOOL:
      return value.BOOL as T;
    case !!value.L:
      return value.L?.map((item) =>
        attributeValueToValue(item)
      ) as unknown as T;
    case !!value.M:
      return Object.entries(value.M || []).reduce(
        (acc, [key, item]) => ({ ...acc, [key]: attributeValueToValue(item) }),
        {}
      ) as unknown as T;
    default:
      throw new Error(`Unknown type ${JSON.stringify(value)}`);
  }
};


export const attributeMapToValues = (
  items: Record<string, AttributeValue>
): unknown[] =>
  Object.keys(items).reduce(
    (acc, key) => ({
      ...acc,
      [key]: attributeValueToValue(items[key]),
    }),
    []
  );


export const removePrefix = (id: string, prefix: string): string =>
  id.replace(prefix, "");


export const addPrefix = (id: string, prefix: string): string =>
  `${prefix}${removePrefix(id, prefix)}`;
Creating a new student
Finally we are now ready to start sending CRUD operation API calls to DynamoDB!
Open the index.ts file and paste the following code then from the cmd line run yarn dev.
import { getStudentById, saveStudent } from "./domain/student";


Promise.resolve()
  .then(async () => {
    const id = await saveStudent({
      firstName: "John",
      lastName: "Smith",
      email: "[email protected]",
    });


    const john = await getStudentById(id);


    console.log(john);
  })
  .catch((err) => {
    console.error(err);
    process.exit(1);
  })
  .then(() => {
    console.log("done");
    process.exit(0);
  });
You should see something like this returned:
{
  "entityType": "student",
  "id": "dd4c2ee4-9422-4957-ae6f-f9fff748e5ab",
  "firstName": "John",
  "lastName": "Smith",
  "email": "[email protected]",
  "xp": 0
}
Now use the CLI to scan DynamoDB by running:
aws dynamodb scan --table-name demo-table --no-cli-pager
You can see from the output how DynamoDB internally stores and types data, where N is referring to a number type and S string type and should clear up any questions you may have been pondering about the code in utils.ts.
{
  "Items": [
    {
      "entityType": {
        "S": "student"
      },
      "lastName": {
        "S": "Smith"
      },
      "email": {
        "S": "[email protected]"
      },
      "xp": {
        "N": "0"
      },
      "sk": {
        "S": "student#dd4c2ee4-9422-4957-ae6f-f9fff748e5ab"
      },
      "pk": {
        "S": "student#dd4c2ee4-9422-4957-ae6f-f9fff748e5ab"
      },
      "firstName": {
        "S": "John"
      }
    }
  ],
  "Count": 1,
  "ScannedCount": 1,
  "ConsumedCapacity": null
}
Get a student by email address
What if we only had the student email address to go on in order to find our record? We can support this access pattern by adding a global secondary index.
First, we need to destroy our original table (we will get around this step for future terraform changes by introducing a truncate table function):
terraform destroy
Next, update the terraform by adding the following GSI to our demo-table:
attribute {
  name = "gsi1_pk"
  type = "S"
}


attribute {
  name = "gsi1_sk"
  type = "S"
}


global_secondary_index {
  name = "gsi1"
  hash_key = "gsi1_pk"
  range_key = "gsi1_sk"
  projection_type = "ALL"
}
Apply this change with:
terraform apply -auto-approve
Next we need to make a slight modification to how we save a student:
export const saveStudent = async ({
  firstName,
  lastName,
  email,
}: {
  firstName: string;
  lastName: string;
  email: string;
}): Promise<string> => {
  const _id = uuidv4();
  const _email = email.toLocaleLowerCase();
  const xp = 0;


  await client.putItem({
    TableName: TABLE_NAME,
    Item: {
      pk: valueToAttributeValue(addPrefix(_id, STUDENT_PREFIX)),
      sk: valueToAttributeValue(addPrefix(_id, STUDENT_PREFIX)),
      gsi1_pk: valueToAttributeValue(_email),
      gsi1_sk: valueToAttributeValue(addPrefix(_id, STUDENT_PREFIX)),
      firstName: valueToAttributeValue(firstName),
      lastName: valueToAttributeValue(lastName),
      xp: valueToAttributeValue(xp),
      entityType: valueToAttributeValue(entityType),
    },
  });


  return _id;
};
Notice how we no longer explicitly store the email instead using it as our GSI PK value.
We need to make a slight tweak to how we transform DynamoDB student data:
export const dynamoRecordToStudent = (record: any) => {
  const { pk, gsi1_pk, ...data } = record;


  return omit(["sk", "gsi1_sk"], {
    ...attributeMapToValues(data),
    id: removePrefix(attributeValueToValue<string>(pk), STUDENT_PREFIX),
    email: attributeValueToValue<string>(gsi1_pk),
  });
};
Finally, we can query using our newly created GSI gsi1 to get a student record by email address:
export const getStudentByEmail = (email: string) =>
  client
    .query({
      TableName: TABLE_NAME,
      IndexName: "gsi1",
      KeyConditionExpression: "#gsi1_pk = :gsi1_pk",
      ExpressionAttributeNames: {
        "#gsi1_pk": "gsi1_pk",
      },
      ExpressionAttributeValues: {
        ":gsi1_pk": {
          S: email.toLocaleLowerCase(),
        },
      },
    })
    .then((res) => head(pathOr([], ["Items"], res).map(dynamoRecordToStudent)));
Updating a student
In order to update a student we need to use the update method and provide both the partition and sort key in order to uniquely identify the item we would like to update.
export const updateStudent = async ({
  id,
  firstName,
  lastName,
  email,
}: {
  id: string;
  firstName?: string;
  lastName?: string;
  email?: string;
}) => {
  const updateExpressionParts = [];
  const ExpressionAttributeValues: Record<string, any> = {};


  if (firstName !== undefined) {
    updateExpressionParts.push("#firstName = :firstName");
    ExpressionAttributeValues[":firstName"] = valueToAttributeValue(firstName);
  }


  if (lastName !== undefined) {
    updateExpressionParts.push("#lastName = :lastName");
    ExpressionAttributeValues[":lastName"] = valueToAttributeValue(lastName);
  }


  if (email !== undefined) {
    updateExpressionParts.push("#gsi1_pk = :gsi1_pk");
    ExpressionAttributeValues[":gsi1_pk"] = valueToAttributeValue(email);
  }


  const UpdateExpression = `SET ${updateExpressionParts.join(", ")}`;


  const ExpressionAttributeNames = {
    ...(firstName && { "#firstName": "firstName" }),
    ...(lastName && { "#lastName": "lastName" }),
    ...(email && { "#gsi1_pk": "gsi1_pk" }),
  };


  await client.updateItem({
    TableName: TABLE_NAME,
    Key: {
      pk: valueToAttributeValue(addPrefix(id, STUDENT_PREFIX)),
      sk: valueToAttributeValue(addPrefix(id, STUDENT_PREFIX)),
    },
    UpdateExpression,
    ExpressionAttributeNames,
    ExpressionAttributeValues,
  });
};
Deleting data
First let’s start with the fact that truncating a table in DynamoDB is not natively supported other than by deleting the entire table and then recreating it (as we had to do previously in order to introduce a new GSI). I’m going to add a truncate method to our client.ts but I want to stress this is only for testing purposes and shouldn’t be used in production. The reason is that in order to know what to delete, we have to scan the whole table, and every operation in DynamoDB will incur costs, so if you have a table with a million items, then it's going to be cheaper for you to just remove that table and start again (with some kind of data migration process so you don’t lose any production data). Here is our truncate function:
type AttributeMap = Record<string, AttributeValue>;


const getItemKeyAndValue = (item: AttributeMap, key?: string) =>
  key ? { [`${key}`]: item[`${key}`] } : {};


export const truncateTable = async (
  client: DynamoDB,
  TableName: string,
  hash: string,
  range?: string
): Promise<void> => {
  const { Items } = await client.scan({ TableName });
  if (!Items) {
    return;
  }
  const keys = Items.map((item: AttributeMap) => ({
    ...getItemKeyAndValue(item, hash),
    ...getItemKeyAndValue(item, range),
  }));
  if (!keys.length) {
    return;
  }
  await Promise.all(keys?.map((Key) => client.deleteItem({ TableName, Key })));
};
To truncate the demo-table:
await truncateTable(dynamoClient, TABLE_NAME, "pk", "sk");
To delete a specific student we wouldn’t actually want to use the deleteItem method from the SDK. NoSQL databases have no concept of referential integrity and if we had any other items in our database that were referring to a student that no longer existed this would be an issue and DynamoDB will happily delete any item for us that we tell it to without the luxury of a safety net ensuring there are no foreign key references like a relational database would do (and subsequently throw an error for that delete operation).
To be on the safe side we will implement a soft delete and make a slight modification to our two read functions.
export const deleteStudent = async (id: string) => {
  await client.updateItem({
    TableName: TABLE_NAME,
    Key: {
      pk: valueToAttributeValue(addPrefix(id, STUDENT_PREFIX)),
      sk: valueToAttributeValue(addPrefix(id, STUDENT_PREFIX)),
    },
    UpdateExpression: "SET #deleted = :deleted",
    ExpressionAttributeNames: {
      "#deleted": "deleted",
    },
    ExpressionAttributeValues: {
      ":deleted": valueToAttributeValue(true),
    },
  });
};
The query for getStudentByEmail should now filter out deleted records. It is important to note that this “filtering” is happening client side and not at the database meaning this query will still incur the same cost for retrieving deleted records.
{
  TableName: TABLE_NAME,
  IndexName: "gsi1",
  KeyConditionExpression: "#gsi1_pk = :gsi1_pk",
  ExpressionAttributeNames: {
    "#gsi1_pk": "gsi1_pk",
  },
  ExpressionAttributeValues: {
    ":gsi1_pk": {
      S: email.toLocaleLowerCase(),
    },
    ":notDeleted": {
      BOOL: false,
    },
  },
  FilterExpression:
    "attribute_not_exists(deleted) OR deleted = :notDeleted",
 }
The function getStudentById uses getItem, so we don’t have the option to apply a filter expression, instead we will write the logic explicitly:
export const getStudentById = (id: string): Promise<Student | null> =>
  client
    .getItem({
      TableName: TABLE_NAME,
      Key: {
        pk: valueToAttributeValue(addPrefix(id, STUDENT_PREFIX)),
        sk: valueToAttributeValue(addPrefix(id, STUDENT_PREFIX)),
      },
    })
    .then(({ Item }) => {
      if (!Item) {
        return null;
      }
      const _item = dynamoRecordToStudent(Item);
      return _item.deleted ? null : _item;
    });
Atomic Updates With ACID Compliance
DataCamp collects XP data for each student providing motivation, a sense of achievement, an easy way to track overall progress and a means for which students can measure themselves against their peers. In a relational database, we have various tools at our disposal in order to manipulate and aggregate data but this is not the case for NoSQL databases. Although some NoSQL databases like MongoDB do provide an aggregation framework, these tools tend to break down when the database reaches large scales and the reason to choose NoSQL is often for the very reason that we need to support huge volumes of data and traffic.
In DynamoDB, atomic updates refer to the ability to perform certain update operations on a single attribute of an item in a way that ensures atomicity, consistency, isolation, and durability (ACID properties). Atomic updates are operations that modify a specific attribute's value in a way that guarantees the operation's success even in the presence of concurrent updates.
Using this technique we can easily add XP when a user completes a learning goal.
export const updateStudentXp = async ({
  id,
  xp,
}: {
  id: string;
  xp: number;
}) => {
  await client.updateItem({
    TableName: TABLE_NAME,
    Key: {
      pk: valueToAttributeValue(addPrefix(id, STUDENT_PREFIX)),
      sk: valueToAttributeValue(addPrefix(id, STUDENT_PREFIX)),
    },
    UpdateExpression: "set xp = xp + :inc",
    ExpressionAttributeValues: {
      ":inc": valueToAttributeValue(xp),
    },
  });
};
If this code looks familiar it’s because we already used this pattern for the deleteStudent function!
Conclusion
In this tutorial, we explored the fundamentals of Amazon DynamoDB, a serverless, highly scalable database offered by AWS. DynamoDB's key features, including seamless scalability, high availability, and flexible data modeling, make it an excellent choice for modern applications.
We covered essential topics like creating tables, performing CRUD operations using Node.js, and discussed the significance of atomic updates for maintaining data consistency. Throughout the tutorial, we developed a data model and implemented functions to interact with DynamoDB.
As you continue your DynamoDB journey, consider diving into advanced topics like single table design, performance optimization, and DynamoDB Streams for real-time data processing. DynamoDB's versatility and scalability empower you to build high-performance, serverless applications within the AWS ecosystem.
You can find the complete source code from this tutorial on Github. Happy coding!
Additional Learning Materials
- DataCamp tutorial: Single table design with DynamoDB
- DataCamp course: NoSQL concepts
- AWS re:Invent: Advanced Design Patterns for DynamoDB
- Rick Houlihan: Fundamentals of DynamoDB Single Table Design
- Alex DeBrie: The DynamoDB book


blog
NoSQL Databases: What Every Data Scientist Needs to Know

Zoumana Keita
12 min
blog
SQL vs NoSQL Databases: Key Differences and Practical Insights
Kevin Babitz
15 min
tutorial
Performance and Scalability Unleashed: Mastering Single Table Database Design with DynamoDB
Gary Alway
16 min
tutorial
A Comprehensive NoSQL Tutorial Using MongoDB

Arunn Thevapalan
9 min
tutorial
Mastering AWS Step Functions: A Comprehensive Guide for Beginners
Zoumana Keita
tutorial
MySQL Tutorial: A Comprehensive Guide for Beginners

Javier Canales Luna
15 min