How to Analyze Data in Google Sheets With Python: A Step-By-Step Guide
Companies run on spreadsheets. From financial management and budgeting to project management and KPI reporting: every team relies on spreadsheets in some shape or form.
If you want to be effective as an analyst in this spreadsheet-driven environment, it’s crucial that you know how to programmatically access data in spreadsheets as well as write the results of your analyses back to spreadsheets.
By automating the process, you can meet your stakeholders where their data is stored and avoid the tedium of manually exporting and importing data into spreadsheets.
In this tutorial, we’ll cover all the necessary steps to access data that lives in a Google Sheet spreadsheet, analyze it, and write it back to a spreadsheet. We will do all of this with Python with no repetitive manual steps involved!
We’ll use DataLab in this tutorial, which supports two ways to work with data in Google Sheets:
- With the built-in Google Sheets connector: this is by far the simplest way, but only supports reading data from Google Sheets, not writing back data to Google Sheets.
- With the Google Sheets API: this requires more setup but gives you maximum flexibility, as you can read data from Google Sheets as well as write data back to Google Sheets.
Regardless of your choice, all you need to follow along is a Google account (to house the spreadsheet) and a DataCamp account (to use DataLab), both of which you can create for free!
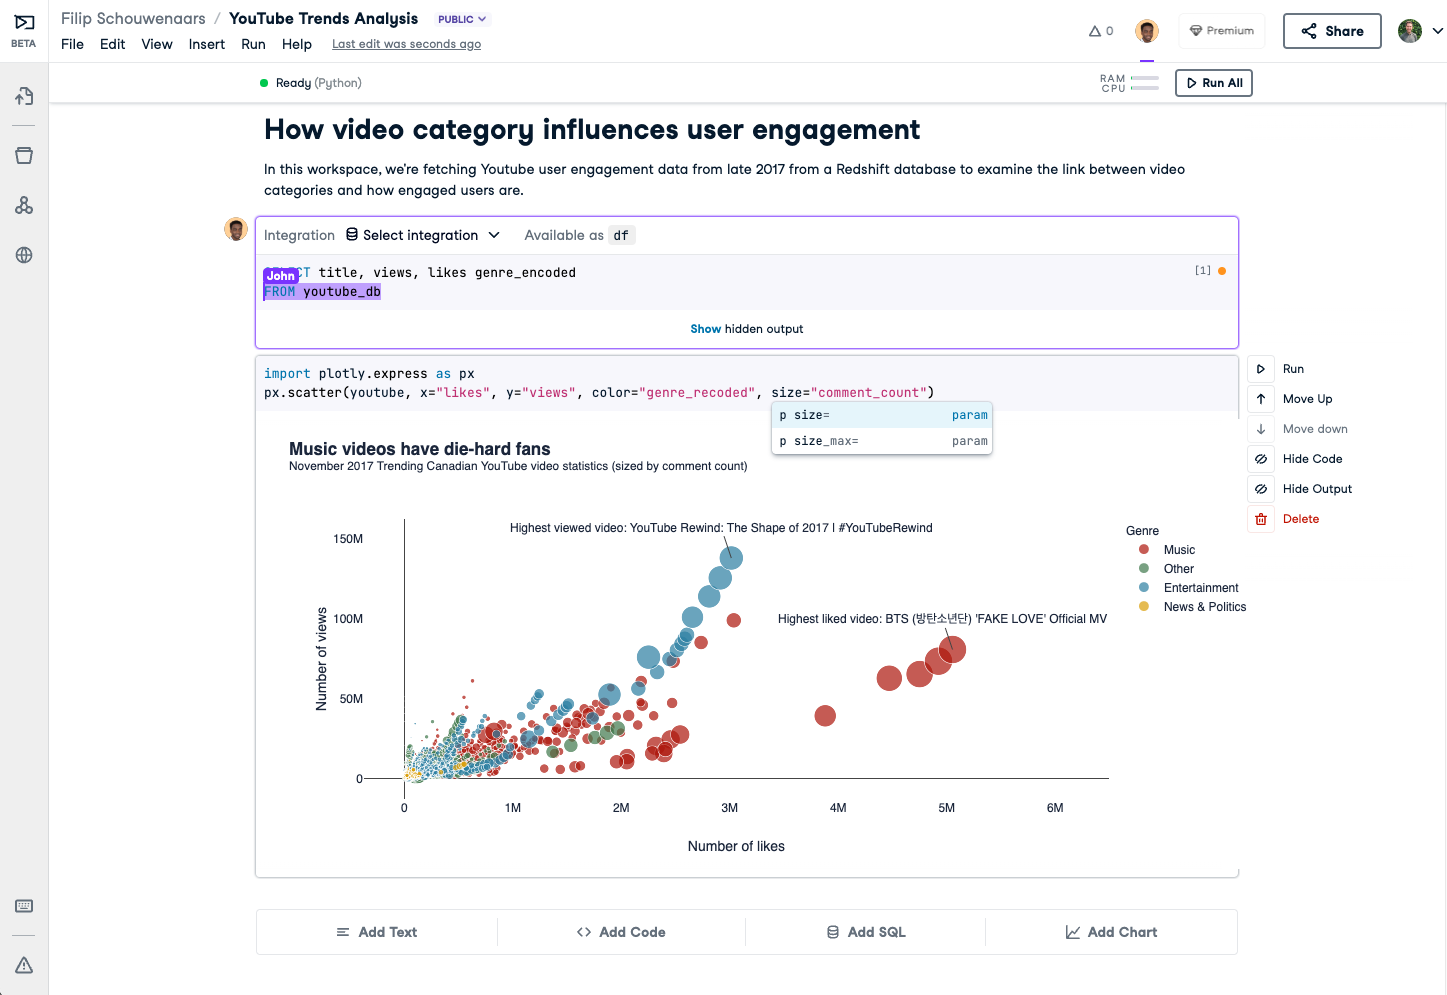
The DataLab editor
With the Built-in Google Sheets Connector
Choose this option if you only want to read data from a Google Sheet to analyze in Python but are not looking to write the results of your calculations back to a Google Sheet.
1. Create a Google Spreadsheet with data
Before you can analyze data in spreadsheets, you need to make sure you have a spreadsheet with data in it. If you don’t have a dataset lying around, you can start from a Google Sheet that we prepared for this tutorial: Open the example spreadsheet, and once in the Google Sheet, click “File > Make a copy,” specify a name, and click “Make a copy.” If you already have a spreadsheet with data you want to analyze, you can skip this step.
2. Create a new workbook
Next up is creating a new data project inside DataLab, called a workbook. You can either create an empty workbook from scratch, which is useful if you want to write all the code yourself, or create a workbook that already has the code included.
Run and edit the code from this tutorial online
Run Code3. Set up a connection
When inside a workbook, click View > Databases and click the + icon. You’re presented with an overview of all the database technologies that DataLab allows you to connect to:

Select Google Sheets. You’re now asked to grant Grant DataCamp permission to access files in your Google Drive.
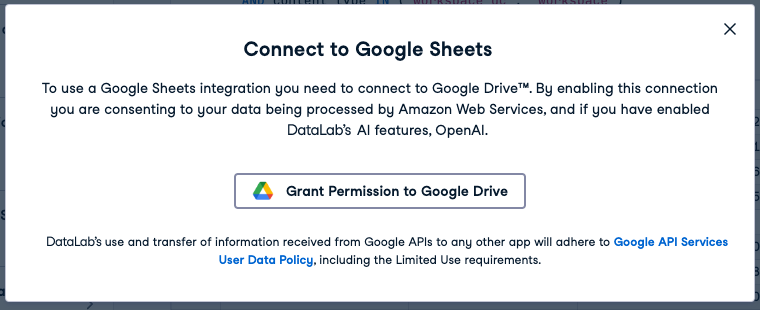
Click “Grant permission to Google Drive.” Finally, a file picker will appear:
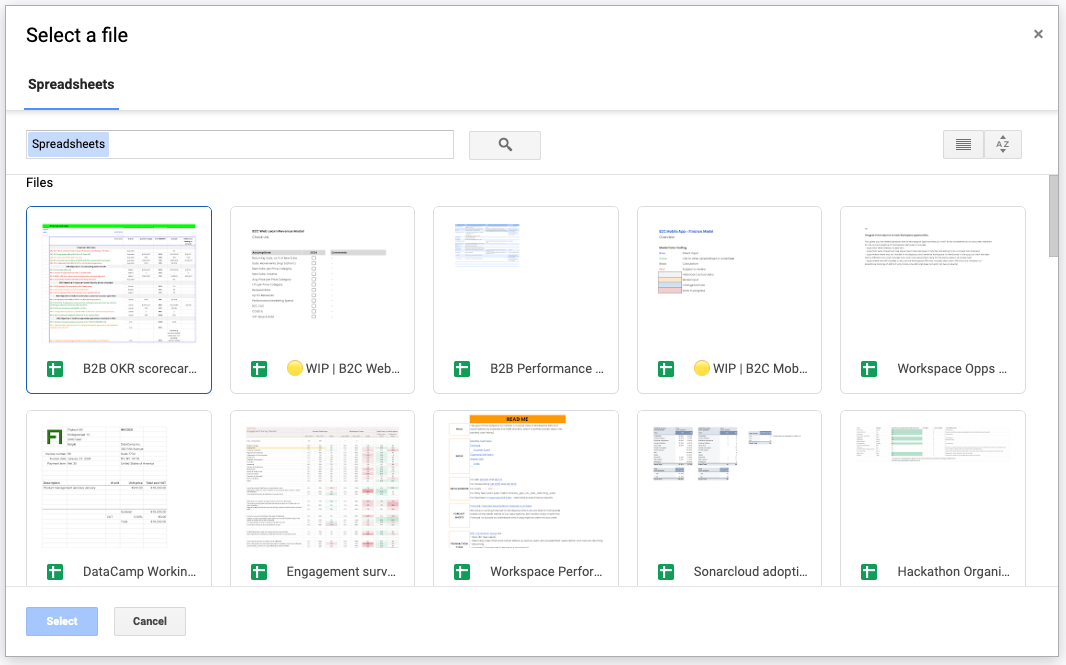
Select the Spreadsheet file you wish to read data from. This is either the copy of the example Google Sheet that we’ve provided or your own Google Sheet.
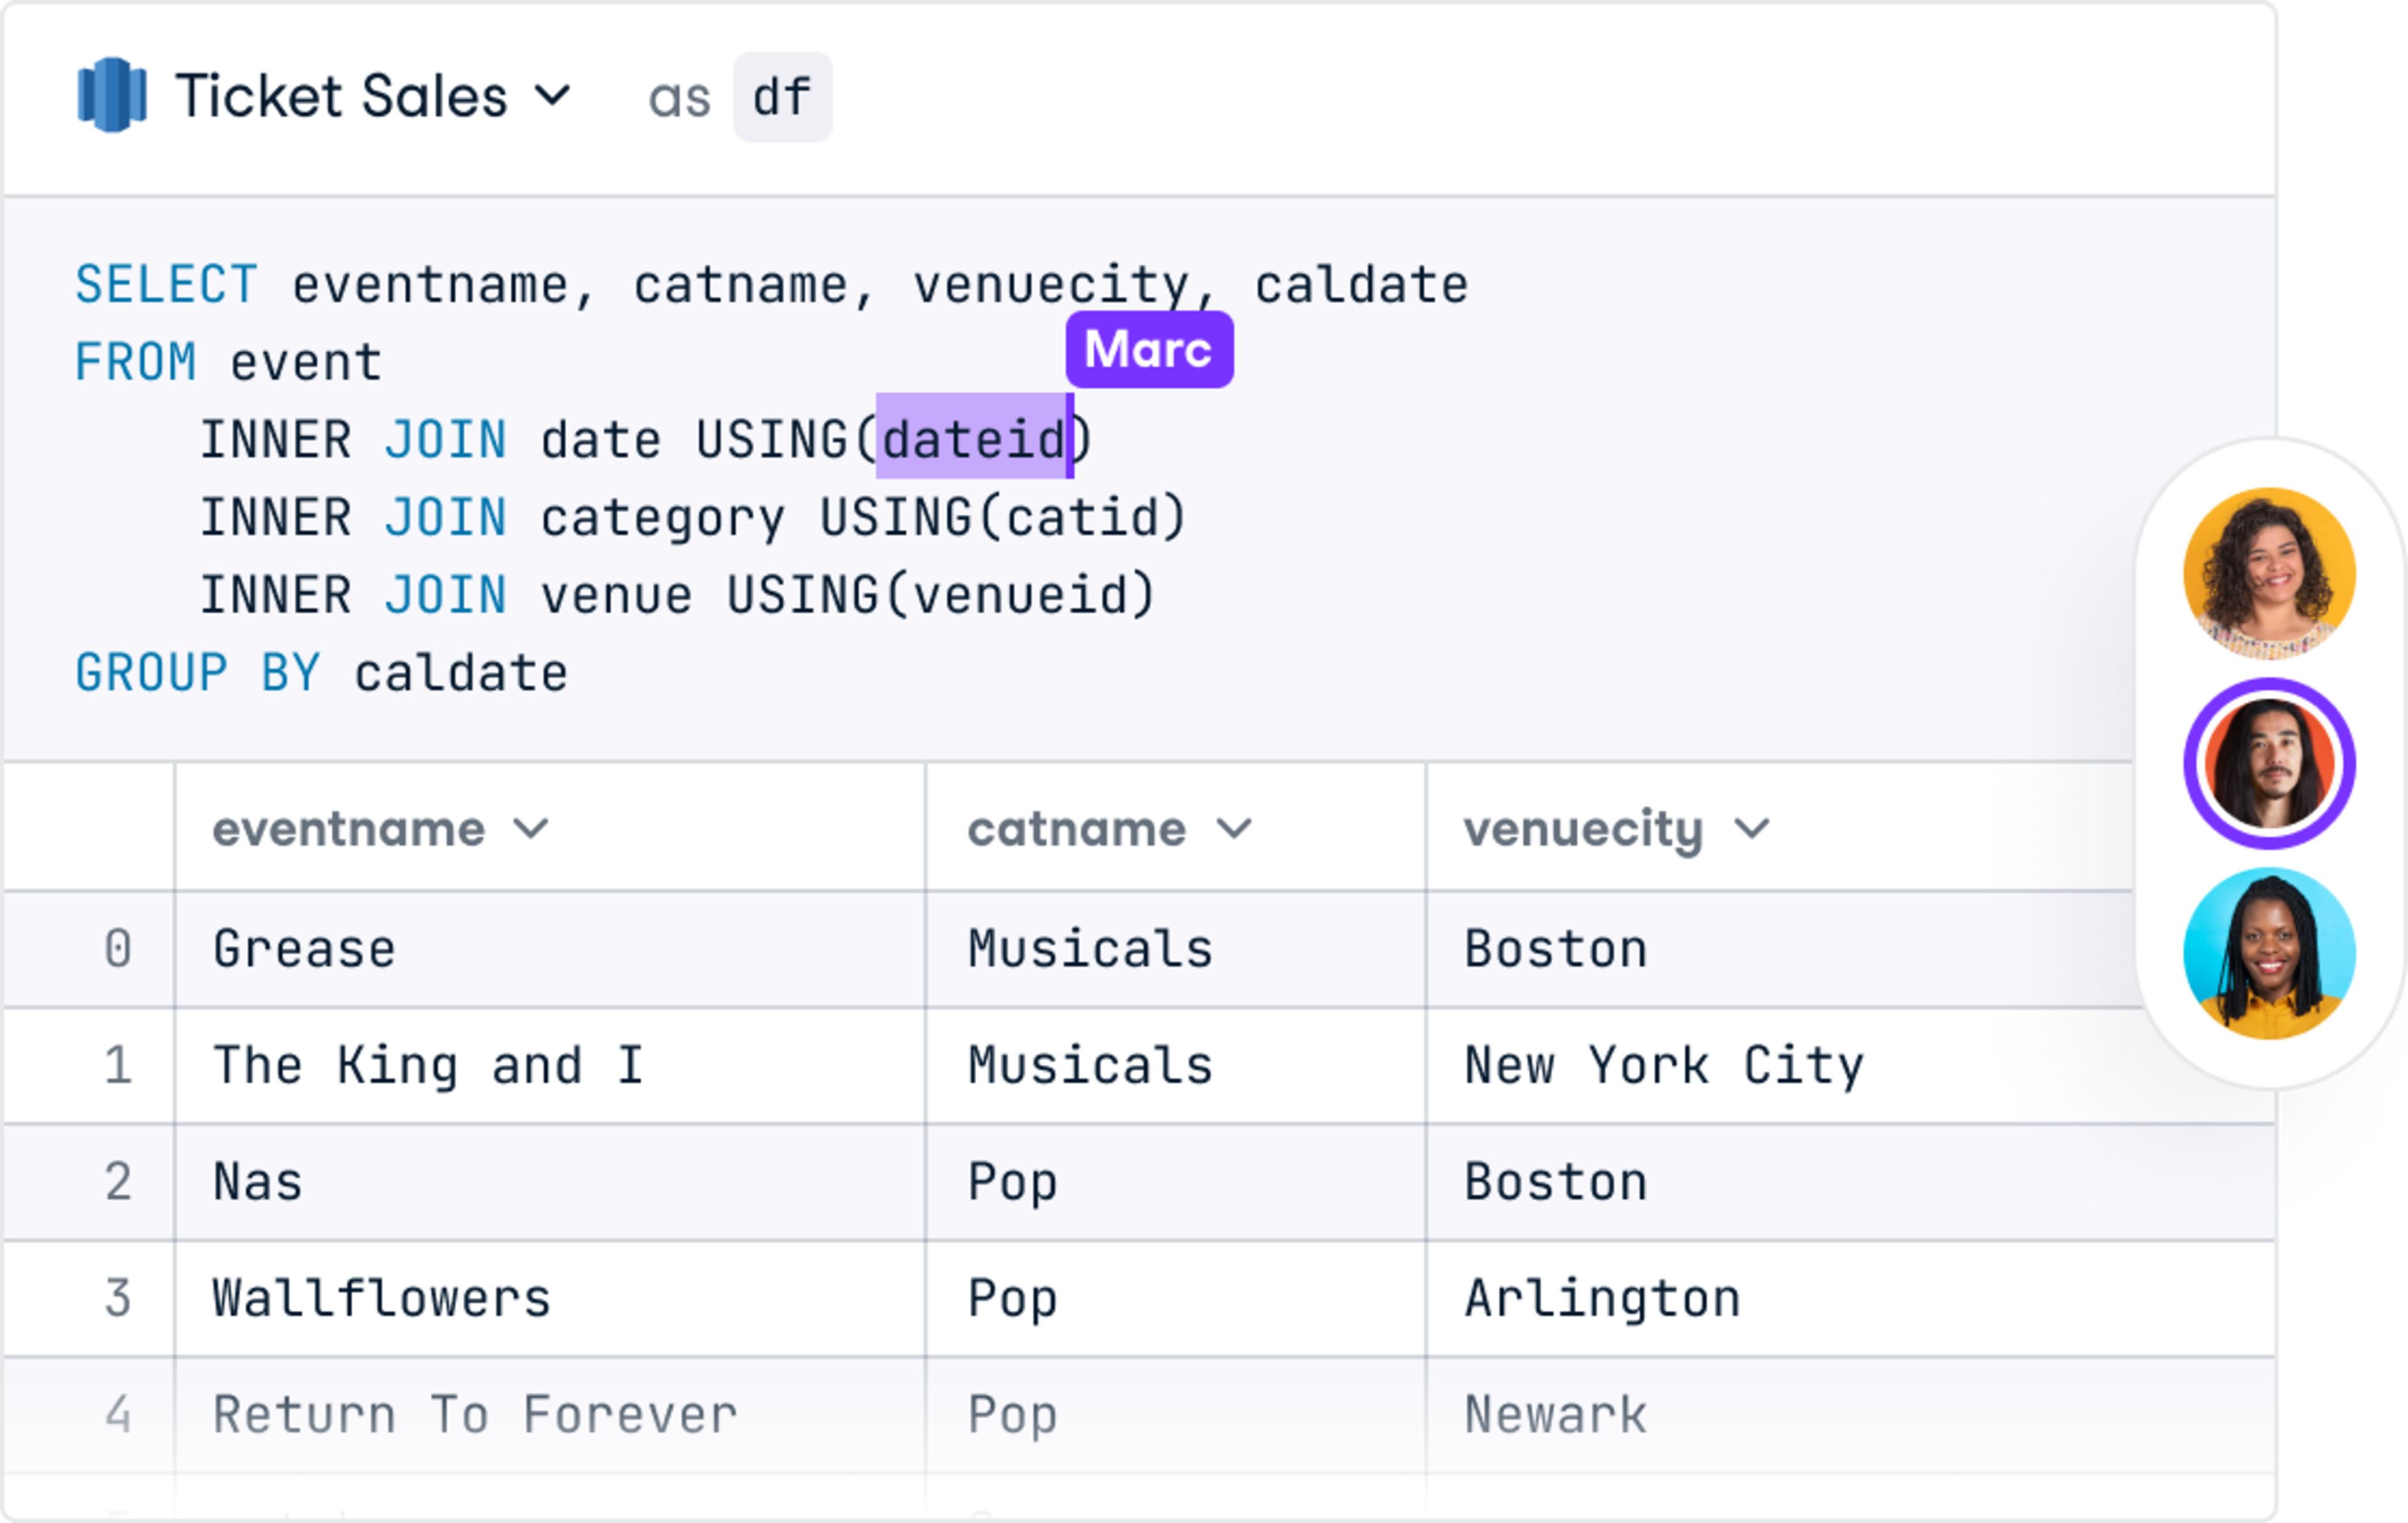
4. Query the Google Sheets file
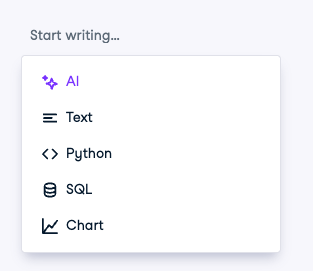
You can now query the Google Sheets file you just connected! You’ll do this with a SQL cell, a building block in DataLab to query databases with SQL. If you’ve created a workbook from the provided template, you’ll already have this SQL cell ready in your notebook. If you started a workbook from scratch, you can add it by opening up the launcher and clicking “SQL”:
In the SQL cell itself, click the Source dropdown in the top left corner.

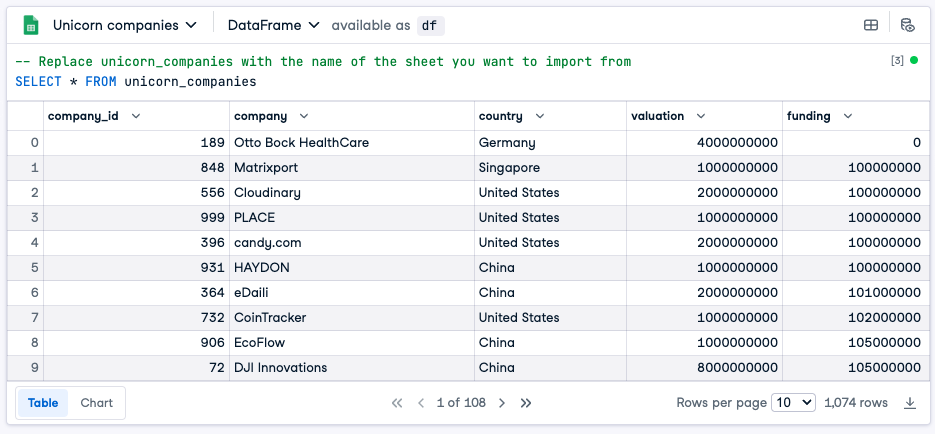
Select the spreadsheet you want to analyze (in the example case it's "Unicorn Companies". Next, write the following SQL query:
SELECT * FROM unicorn_companiesIf you click Run, this query will fetch all of the rows in the unicorn_companies sheet inside the Unicorn Companies Google Sheet, and stores the result in a new Pandas DataFrame df:
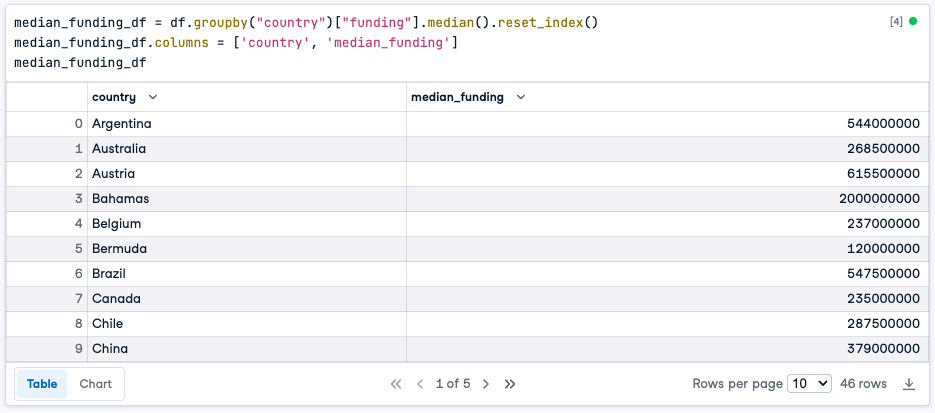
A pandas DataFrame is a table-like data structure that you can use in Python to store and manipulate data. Let’s add a Python cell, and execute the following code, that calculates the median funding for the unicorn companies in the dataset on a per-country basis:
median_funding_df = df.groupby("country")["funding"].median().reset_index()
median_funding_df.columns = ['country', 'median_funding']
median_funding_df
In the SQL cell above, we went with a straightforward SQL query to just grab all of the data, but you can just as well use a more sophisticated SQL statement to fetch the top 10 most valuable unicorn companies in the United States, for example:
SELECT *
FROM unicorn_companies
WHERE country = 'United States'
ORDER BY valuation DESC
LIMIT 10
That’s all there is to it! For more pro tips on how you can further tweak the SQL query, for example, to zoom in on a selection of a sheet, check out the corresponding DataLab documentation article.
As mentioned earlier, this seamless connection with Google Sheets can only be used to read data from a Google Sheet. If you’re looking to both read data from and write results back to Google Sheets, look at the next section that explains how to leverage the Google Sheets API for a maximally flexible setup.
Using the Google Sheets API
Choose this option if you want to both read data from a Google Sheet as well as write the result of your calculations in Python back to the same or another Google Sheet.
As mentioned in the introduction, the increase in flexibility comes at the cost of a more involved setup. More specifically, the steps we will take are:
- Configure a Google Service Account
- Create a Google spreadsheet with data
- Create a new workbook
- Store your service account credentials in DataLab
- Read Google Sheets data
- Analyze the data in Python
- Write results to Google Sheets
Let’s dive into each one of them separately.
1. Configure a Google Service Account
To programmatically access data in Google Sheets, you need to create a Google service account, which is a special kind of account that can be used by programs to access Google resources like a spreadsheet. You will then use this service account to connect DataLab to Google Sheets.
You only have to set up this Google service account once for every Google account that you want to access spreadsheets in; you can skip this step the next time you want to work with spreadsheets data in the same account.
Follow the steps below to create the service account and generate the necessary credentials.
- Make sure you’re signed in with your Google account.
- Navigate to the Google API Library
- Create a new project by clicking in the dropdown on the navbar.
- Search for the “Google Sheets API” and enable it. This can take up to 10 seconds.
- In the “APIs and services” navbar on the left, go to the “Credentials tab”
- Click on “+ CREATE CREDENTIALS” and select “Service Account”
- In the first step (service account details), provide a name for the service account, e.g., “gsheet-operator” and click on “Create and continue”
- In the second step, select the “Owner” role and click “Continue”
- In the third step, don’t change anything and click “Done”
- Once back on the Credentials page, click on the service account you just created.
- Go to the Keys tab, click “Add Key > Create new key”
- Choose “JSON,” then click “Create.” The JSON file with your service account credentials will automatically download to your computer.
You now have a service account and a JSON credentials file! Head over to your Downloads folder or wherever the JSON file was downloaded, open it up, and have a look. It should look something like this:
{
  "type": "service_account",
  "project_id": "<your-project-name>",
  "private_key_id": "<something-private>",
  "private_key": "-----BEGIN PRIVATE KEY-----\nM<some-very-private-stuff\n",
  "client_email": "[email protected]",
  "client_id": "123456789012345678901",
  "auth_uri": "https://accounts.google.com/o/oauth2/auth",
  "token_uri": "https://oauth2.googleapis.com/token",
  "auth_provider_x509_cert_url": "https://www.googleapis.com/oauth2/v1/certs",
  "client_x509_cert_url": "https://www.googleapis.com/robot/v1/metadata/x509/gsheets-operator%40<project-name>.iam.gserviceaccount.com"
}
There’s a “client_email” field in there: gsheets-operator@<google-project-name>.iam.gserviceaccount.com. Copy this email to your clipboard; you’ll need it in the next step.
2. Create a Google Spreadsheet With Data
Before you can analyze data in spreadsheets, you need to make sure you have a spreadsheet with data in it. If you don’t have a dataset lying around, you can start from a Google Sheet that we prepared for this tutorial: Open the example spreadsheet and once in the Google Sheet, click “File > Make a copy,” specify a name, and click “Make a copy.” If you already have a spreadsheet with data you want to analyze, just open up that spreadsheet.
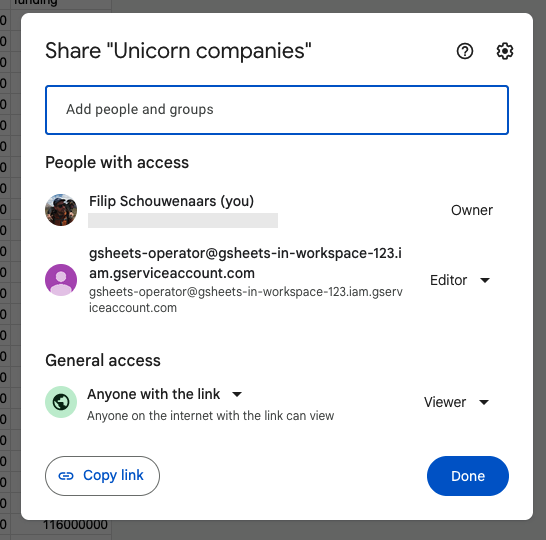
Regardless of whether you’re working with a duplicate of the example spreadsheet or your own spreadsheet, you need to give the Google service account that you created in the first step access to the spreadsheet:
- Click “Share”
- Add the email of the service account that you copied to your clipboard in the previous step as an editor to the spreadsheet (e.g. gsheets-operator@<google-project-name>.iam.gserviceaccount.com)
- Click “Send”
Alright, service account: check. Google spreadsheet with the right access: check. It’s time to write some Python code!
3. Create a New Workbook
Next up is creating a new data project inside DataLab, also called a workbook. You can either create an empty workbook from scratch, which is useful if you want to write all the code yourself, or create a workbook that has all the code included.
Run and edit the code from this tutorial online
Run Code4. Store Your Service Account Credentials in DataLab
To use the service account credentials JSON in your newly created workbook, you need to store it in DataLab.
You could copy and paste the contents of the JSON inside a code cell of your newly created workbook:
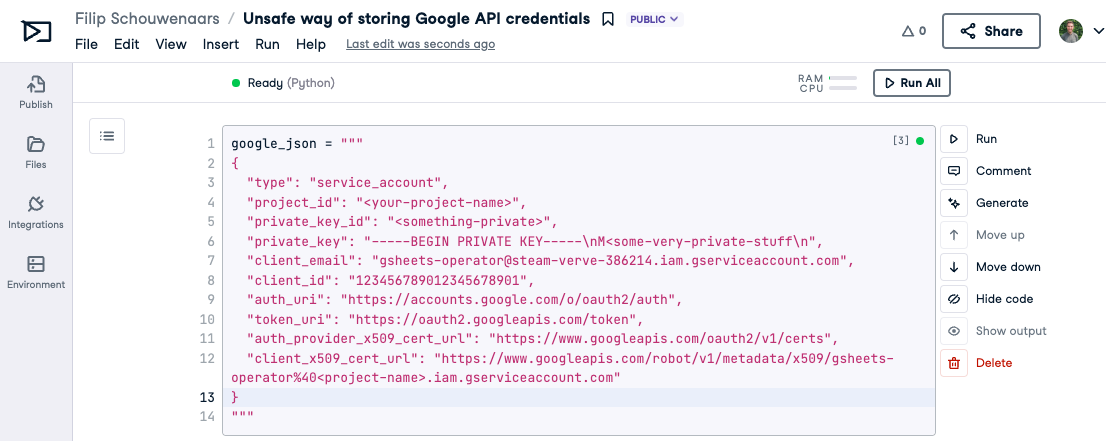
This is not a secure approach and not recommended. If you share your notebook with someone else, they can see the credentials in clear text. They would then be able to impersonate you and get access to resources this service account has access to.
This approach would also require you to repeat this code in every workbook that you want to use to access spreadsheet data. If you want to rotate the credentials, you’ll have to go through and edit every workbook.
A more secure and scalable approach is storing the JSON in a so-called environment variable. When you connect this environment variable, it will become available in your Python session. In your workbook:
- Click the “Environment” tab on the left-hand side
- Click on the plus icon next to “Environment Variables”
- In the “Add Environment Variables” modal:
- Set “Name” to
GOOGLE_JSON - Set “Value” to the full contents of the service account JSON file that was downloaded. You can do this by opening the JSON file, selecting all, copying it to your clipboard, and then pasting it in the Value field.
- Set the “Environment Variables Set Name” to “Google Service Account” (this can be anything, really)
- Set “Name” to
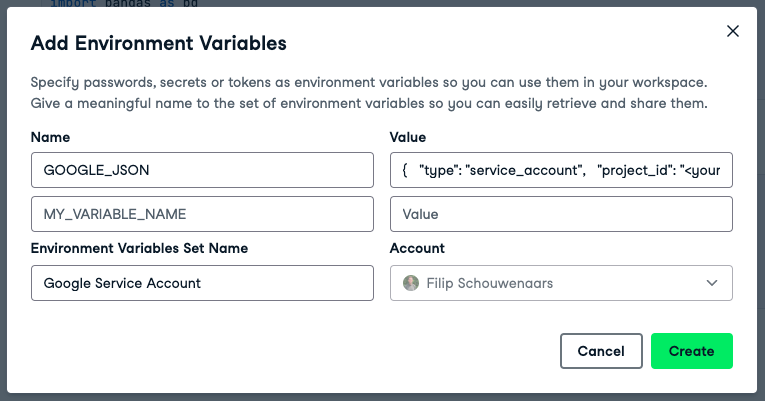
After filling in all fields, click “Create,” “Next,” and finally, “Connect.” Your DataLab session will restart, and GOOGLE_JSON will now be available as an environment variable in your workbook. You can verify this by creating a Python cell with the following code and running it:
import os
google_json = os.environ["GOOGLE_JSON"]
print(google_json)
If you want to reuse the same services account credentials in another workbook, you don’t need to set up the environment variable again: you can reuse the environment variable in other workbooks.
5. Read Google Sheets Data
Now for the fun part: writing Python code to connect to the Google Sheets data.
Install and import the right packages
Start by installing and importing all the packages required to set up a connection to your Google API account. We’ll be using google-auth to authenticate against the Google API, gspread to easily interface with Google spreadsheets, and pandas to manipulate tabular data in Python.
%%capture
!pip install gspread
from google.oauth2 import service_account
import pandas as pd
import gspread
import json
import os
Set up a client with scoped credentials
Load the GOOGLE_JSON environment variable and store it in a variable:
import os
google_json = os.environ["GOOGLE_JSON"]
Create a credentials object from the service account credentials json:
service_account_info = json.loads(google_json)
credentials = service_account.Credentials.from_service_account_info(service_account_info)
Assign the right ‘API scope’ to the credentials so that it has the right permissions to interface with the Google Sheet spreadsheet:
scope = ['https://spreadsheets.google.com/feeds','https://www.googleapis.com/auth/drive']
creds_with_scope = credentials.with_scopes(scope)
Create a new client with these scoped credentials:
client = gspread.authorize(creds_with_scope)Read spreadsheets data into a DataFrame
With the client ready, we can read the data from the spreadsheet we created earlier.
First, create a new sheet instance from a spreadsheet URL:
spreadsheet = client.open_by_url('https://docs.google.com/spreadsheets/d/spreadsheet_id/edit#gid=0')
Next, zoom in on the worksheet (the tab in the Google spreadsheet) you want to get the data from. Let’s get the first sheet using the index 0:
worksheet = spreadsheet.get_worksheet(0)
First, get all the records as a JSON:
records_data = worksheet.get_all_records()
Next, convert the JSON records into a pandas DataFrame:
records_df = pd.DataFrame.from_dict(records_data)
records_df
Success!
6. Analyze the Spreadsheets Data in Python
You can now use Python to analyze the data you read in from the Google spreadsheet. The minimal code below assumes that you are working with the example spreadsheet. If you are working with another dataset, these steps won’t work. Check out DataCamp’s Data Manipulation with pandas course if you want to dive deeper!
Let’s calculate median funding by country:
median_funding_df = records_df.groupby("country")["funding"].median().reset_index()
median_funding_df.columns = ['country', 'median_funding']
median_funding_df
7. Write the Results to Google Sheets
If you want the spreadsheet users you’re collaborating with to see the fruits of your labor in a spreadsheet, you can write back the results of your Python analysis back to a new Google worksheet (i.e., tab) inside the original spreadsheet.
In this example, we create a new worksheet median_country if it doesn’t exist yet, and then insert the contents of the median_funding_df DataFrame, including the header with column names. This code was generated with the help of the AI Assistant!
# Convert the median_funding_df DataFrame to a list of lists
medians_list = median_funding_df.values.tolist()

# Add the header row to the list
medians_list.insert(0, median_funding_df.columns.tolist())

# Check if the 'median_by_country' sheet already exists
sheet_titles = [sheet.title for sheet in spreadsheet.worksheets()]
sheet_name = "median_by_country"
if sheet_name not in sheet_titles:
    # Create a new worksheet named 'median_by_country' in the Google Sheet
    medians_sheet = spreadsheet.add_worksheet(title=sheet_name, rows=len(medians_list), cols=len(medians_list[0]))
else:
    medians_sheet = spreadsheet.worksheet(sheet_name)

# Write the medians_list to the new worksheet
medians_sheet.clear()
medians_sheet.insert_rows(medians_list, row=1)
If you visit your spreadsheet again, you’ll see a new worksheet with the data from the DataFrame! This ‘writing back’ of results is only possible if you use the Google Sheets API-based way of connecting to Google Sheets; not if you use DataCamp's built-in Google Sheets connector introduced earlier in this tutorial.
Conclusion
Depending on your needs, analyzing data in Google Sheets with Python can be seamless or can require a good chunk of initial setup. If you just want to read data from a sheet, go with the built-in connector and you’re on your way in less than five clicks. If you are looking to both read data from and write data to Google Sheets, it pays off to enable the Google Sheets API and set up a service account.
In both cases, once things are properly configured, accessing data from Google Sheets is almost as easy as querying a CSV file. The big advantage, though, is that you can meet your stakeholders where they are: it’s likely that some of your colleagues swear by spreadsheets.
Out with the times of laborious CSV exports and in with the times of powerful, automatic workflows to work with Google Sheets data without ever leaving DataLab.
DataLab
Skip the installation process and experiment with data science code in your browser with DataLab, DataCamp's AI-powered notebook.
tutorial
Using Python to Power Spreadsheets in Data Science

Jason Graham
21 min
tutorial
Python Excel Tutorial: The Definitive Guide

Natassha Selvaraj
30 min
tutorial
Python Tutorial for Beginners

Matthew Przybyla
12 min
tutorial
Getting Started with Spreadsheets

Ryan Sheehy
5 min
tutorial
Spreadsheets with Tableau

Parul Pandey
14 min
code-along
Analyzing Google Sheets Data in Python

Filip Schouwenaars