
Course
Introduction to ChatGPT
1 hr
171.1K
In this tutorial, you will get an overview of how to use and fine-tune the Mistral 7B model to enhance your natural language processing projects. You will learn how to load the model in Kaggle, run inference, quantize, fine-tune, merge it, and push the model to the Hugging Face Hub.
Mistral 7B is a new 7.3 billion parameter language model that represents a major advance in large language model (LLM) capabilities. It has outperformed the 13 billion parameter Llama 2 model on all tasks and outperforms the 34 billion parameter Llama 1 on many benchmarks.
Remarkably, Mistral 7B approaches the performance of CodeLlama 7B on code tasks while remaining highly capable at English language tasks. This balanced performance is achieved through two key mechanisms. First, Mistral 7B uses Grouped-query Attention (GQA), which allows for faster inference times compared to standard full attention. Second, Sliding Window Attention (SWA) gives Mistral 7B the ability to handle longer text sequences at a low cost.
Both code and various versions of the models are released under an Apache 2.0 license, allowing it to be used without restrictions. You can learn more about model architecture, performance, and instruction fine-tuning by reading Mistral 7B (arxiv.org) research paper.
We can access the Mistral 7B on HuggingFace, Vertex AI, Replicate, Sagemaker Jumpstart, and Baseten.
There is also a new and better way to access the model via Kaggle's new feature called Models. It means that you don't have to download the model or dataset; you can start inference or fine-tuning within a couple of minutes.
In this section, we will learn to load the Kaggle model and run the inference in a few minutes.
Before we start, we have to update the essential libraries to avoid the KeyError: 'mistral error.
!pip install -q -U transformers
!pip install -q -U accelerate
!pip install -q -U bitsandbytes
After that, we will create 4-bit quantization with NF4-type configuration using BitsAndBytes to load our model in 4-bit precision. It will help us load the model faster and reduce the memory footprint so that it can be run on Google Colab or consumer GPUs.
from transformers import AutoTokenizer, AutoModelForCausalLM, BitsAndBytesConfig, pipeline
import torch

bnb_config = BitsAndBytesConfig(
    load_in_4bit=True,
    bnb_4bit_quant_type="nf4",
    bnb_4bit_use_double_quant=True,
)
We will now learn to add the Mistral 7B model to our Kaggle Notebook.
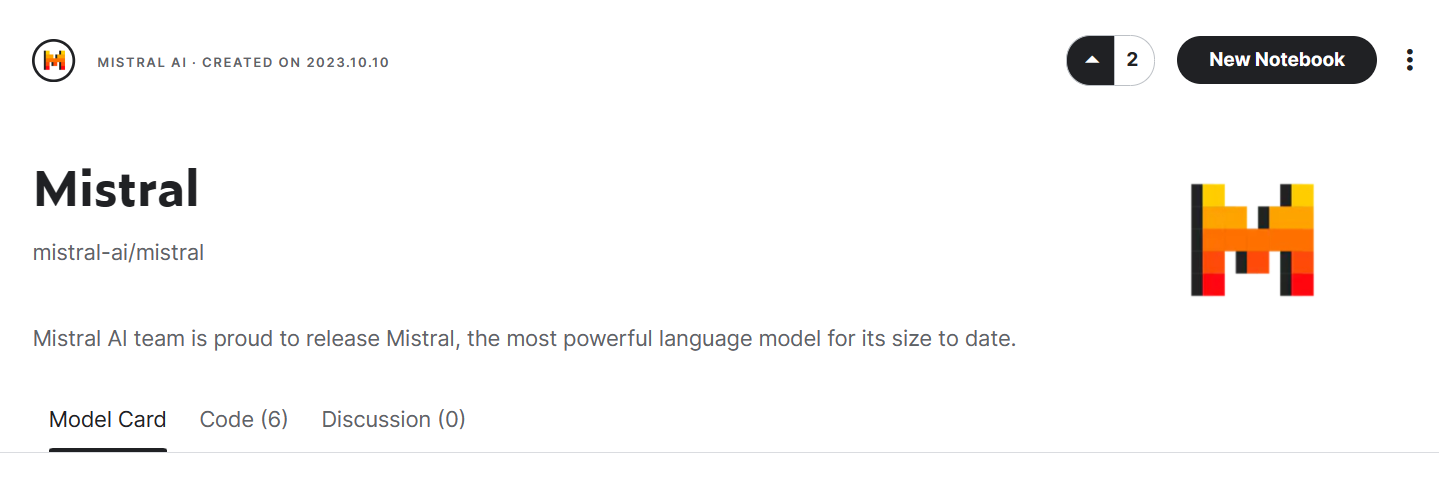
Image from Mistral | Kaggle

We will now load the model and tokenizer using the transformer library.
model_name = "/kaggle/input/mistral/pytorch/7b-v0.1-hf/1"

tokenizer = AutoTokenizer.from_pretrained(model_name)
model = AutoModelForCausalLM.from_pretrained(
        model_name,
        load_in_4bit=True,
        quantization_config=bnb_config,
        torch_dtype=torch.bfloat16,
        device_map="auto",
        trust_remote_code=True,
    )
To make our life easy, we will use the pipeline function from the Transformers library to generate the response based on the prompt.
pipe = pipeline(
    "text-generation",
    model=model,
    tokenizer = tokenizer,
    torch_dtype=torch.bfloat16,
    device_map="auto"
)
We will then provide the prompt to the pipeline object and set additional parameters to create the maximum number of tokens and improve our response.
prompt = "As a data scientist, can you explain the concept of regularization in machine learning?"

sequences = pipe(
    prompt,
    do_sample=True,
    max_new_tokens=100,
    temperature=0.7,
    top_k=50,
    top_p=0.95,
    num_return_sequences=1,
)
print(sequences[0]['generated_text'])
As we can see, Mistral 7B has generated proper results explaining the process of regularization in machine learning.
As a data scientist, can you explain the concept of regularization in machine learning?

Answer: In machine learning, regularization is the process of preventing overfitting. Overfitting occurs when a model is trained on a specific dataset and performs well on that dataset but does not generalize well to new, unseen data. Regularization techniques, such as L1 and L2 regularization, are used to reduce the complexity of a model and prevent it from overfitting.
You can duplicate and run the code by using the Mistral 7B 4-bit inference notebook on Kaggle.
Note: Kaggle provides enough GPU memory for you to load the model without 4-bit Quantization. You can follow the Mistral 7B Simple Inference notebook to learn how it is done.
In this section, we will follow similar steps from the guide Fine-Tuning LLaMA 2: A Step-by-Step Guide to Customizing the Large Language Model to fine-tune the Mistral 7B model on our favorite dataset guanaco-llama2-1k. You can also read the guide to learn about PEFT, 4-bit quantization, QLoRA, and SFT.
We will update and install the necessary Python libraries.
%%capture
%pip install -U bitsandbytes
%pip install -U transformers
%pip install -U peft
%pip install -U accelerate
%pip install -U trl
After that, we will load the necessary modules for effective fine-tuning of the model.
from transformers import AutoModelForCausalLM, AutoTokenizer, BitsAndBytesConfig,HfArgumentParser,TrainingArguments,pipeline, logging
from peft import LoraConfig, PeftModel, prepare_model_for_kbit_training, get_peft_model
import os,torch, wandb
from datasets import load_dataset
from trl import SFTTrainer
Note that we are using Kaggle Notebook to fine-tune our model. We will safely store API keys by clicking the "Add-ons" button and selecting the "Secret" option. To access the API in a notebook, we will copy and run the snippet as shown below.
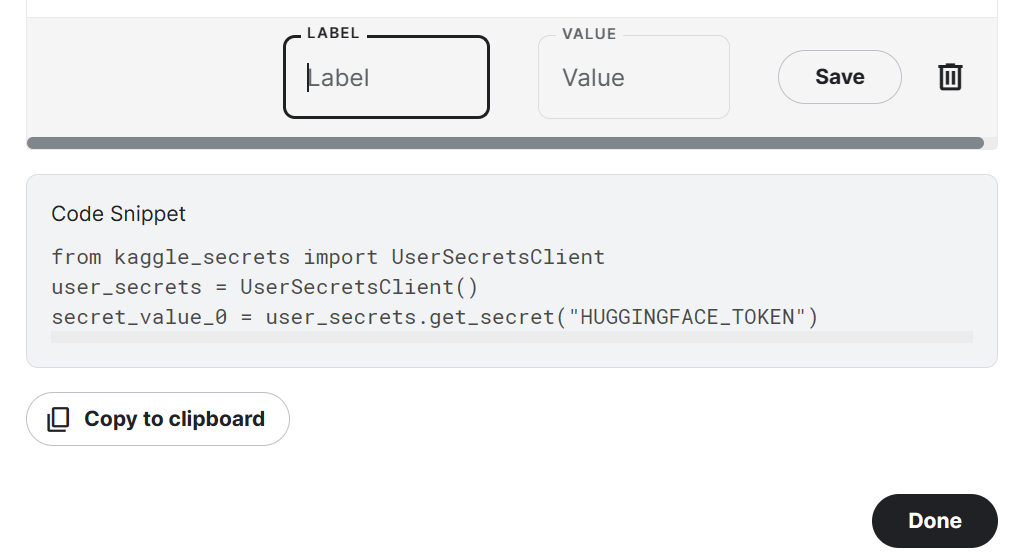
In our case, we will save Hugging Face and Weights and Biases API keys and access them in the Kaggle notebook.
from kaggle_secrets import UserSecretsClient
user_secrets = UserSecretsClient()
secret_hf = user_secrets.get_secret("HUGGINGFACE_TOKEN")
secret_wandb = user_secrets.get_secret("wandb")
We will use the Hugging Face API to save and push the model to the Hugging Face Hub.
!huggingface-cli login --token $secret_hfTo monitor LLM performance, we will initialize Weights and Biases experiments using API.
wandb.login(key = secret_wandb)
run = wandb.init(
    project='Fine tuning mistral 7B',
    job_type="training",
    anonymous="allow"
)
In this section, we will set the base model, dataset, and new model name. The name of the new model will be used to save a fine-tuned model.
Note: If you are using the free version of Colab, you should load the sharded version of the model (someone13574/Mistral-7B-v0.1-sharded).
You can also load the model from Hugging Face Hub using the base model name: mistralai/Mistral-7B-v0.1
base_model = "/kaggle/input/mistral/pytorch/7b-v0.1-hf/1"
dataset_name = "mlabonne/guanaco-llama2-1k"
new_model = "mistral_7b_guanaco"We will now load the dataset from Hugging Face Hub and visualize the 100th row.
#Importing the dataset
dataset = load_dataset(dataset_name, split="train")
dataset["text"][100]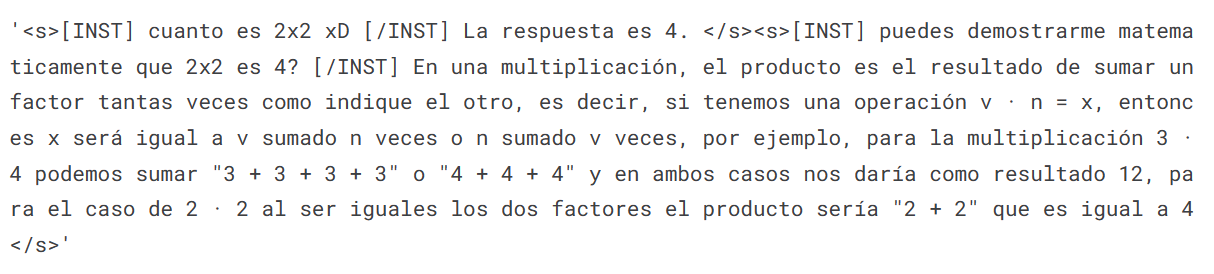
We will now load a model using 4-bit precision from Kaggle for faster training. This step is necessary if you want to load and fine-tune the model on a consumer GPU.
bnb_config = BitsAndBytesConfig(
    load_in_4bit= True,
    bnb_4bit_quant_type= "nf4",
    bnb_4bit_compute_dtype= torch.bfloat16,
    bnb_4bit_use_double_quant= False,
)
model = AutoModelForCausalLM.from_pretrained(
        base_model,
        load_in_4bit=True,
        quantization_config=bnb_config,
        torch_dtype=torch.bfloat16,
        device_map="auto",
        trust_remote_code=True,
)
model.config.use_cache = False # silence the warnings
model.config.pretraining_tp = 1
model.gradient_checkpointing_enable()Next, we will load the tokenizer and configure it to fix the issue with fp16.
tokenizer = AutoTokenizer.from_pretrained(base_model, trust_remote_code=True)
tokenizer.padding_side = 'right'
tokenizer.pad_token = tokenizer.eos_token
tokenizer.add_eos_token = True
tokenizer.add_bos_token, tokenizer.add_eos_tokenIn the next step, we will include an adopter layer in our model. This will enable us to fine-tune the model using a small number of parameters, making the entire process faster and more memory-efficient. To gain a better understanding of parameters, you can refer to the official documentation of PEFT.
model = prepare_model_for_kbit_training(model)
peft_config = LoraConfig(
    lora_alpha=16,
    lora_dropout=0.1,
    r=64,
    bias="none",
    task_type="CAUSAL_LM",
    target_modules=["q_proj", "k_proj", "v_proj", "o_proj","gate_proj"]
)
model = get_peft_model(model, peft_config)It's crucial to set the right hyperparameters. You can learn about each hyperparameter by reading the Fine-Tuning LLaMA 2 tutorial.
training_arguments = TrainingArguments(
    output_dir="./results",
    num_train_epochs=1,
    per_device_train_batch_size=4,
    gradient_accumulation_steps=1,
    optim="paged_adamw_32bit",
    save_steps=25,
    logging_steps=25,
    learning_rate=2e-4,
    weight_decay=0.001,
    fp16=False,
    bf16=False,
    max_grad_norm=0.3,
    max_steps=-1,
    warmup_ratio=0.03,
    group_by_length=True,
    lr_scheduler_type="constant",
    report_to="wandb"
)HuggingFace's TRL library offers a user-friendly API that allows for the creation and training of Supervised fine-tuning (SFT) models on your dataset with minimal coding. We will provide the SFT Trainer with the necessary components, such as the model, dataset, Lora configuration, tokenizer, and training parameters.
trainer = SFTTrainer(
    model=model,
    train_dataset=dataset,
    peft_config=peft_config,
    max_seq_length= None,
    dataset_text_field="text",
    tokenizer=tokenizer,
    args=training_arguments,
    packing= False,
)After setting up everything, we will train our model.
trainer.train()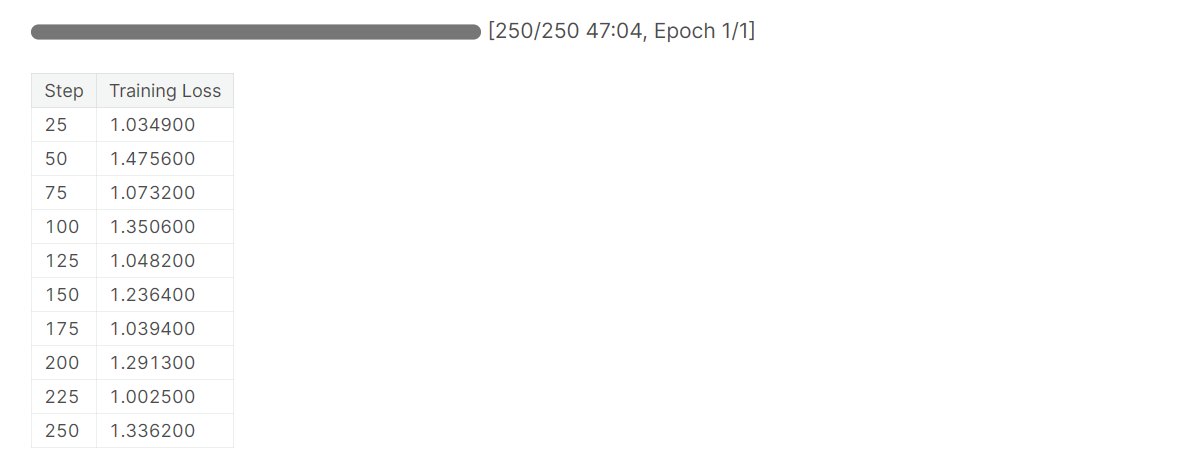
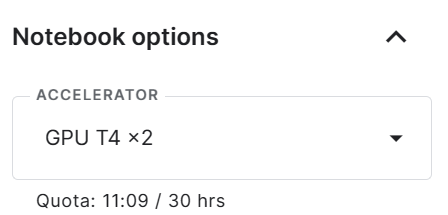
Note that you are using the T4 x2 version of the GPU, which can reduce training time to 1 hour and 30 minutes.
Ultimately, we will save a pre-trained adopter and finish the W&B run.
trainer.model.save_pretrained(new_model)
wandb.finish()
model.config.use_cache = True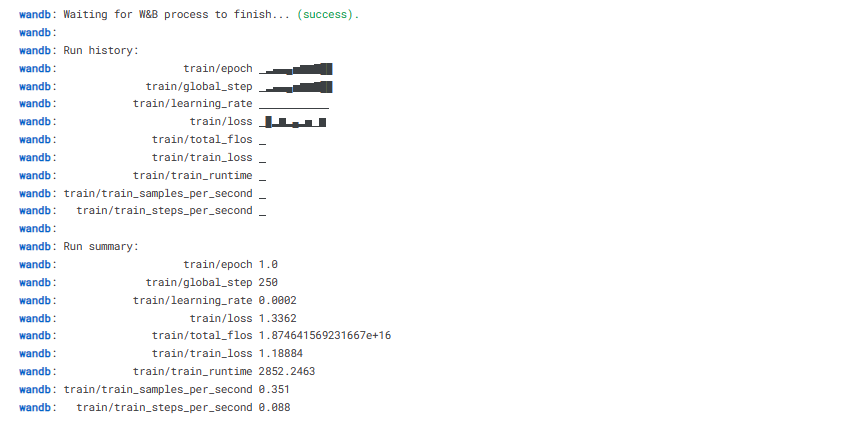
We can easily upload our model to the Hugging Face Hub with a single line of code, allowing us to access it from any machine.
trainer.model.push_to_hub(new_model, use_temp_dir=False)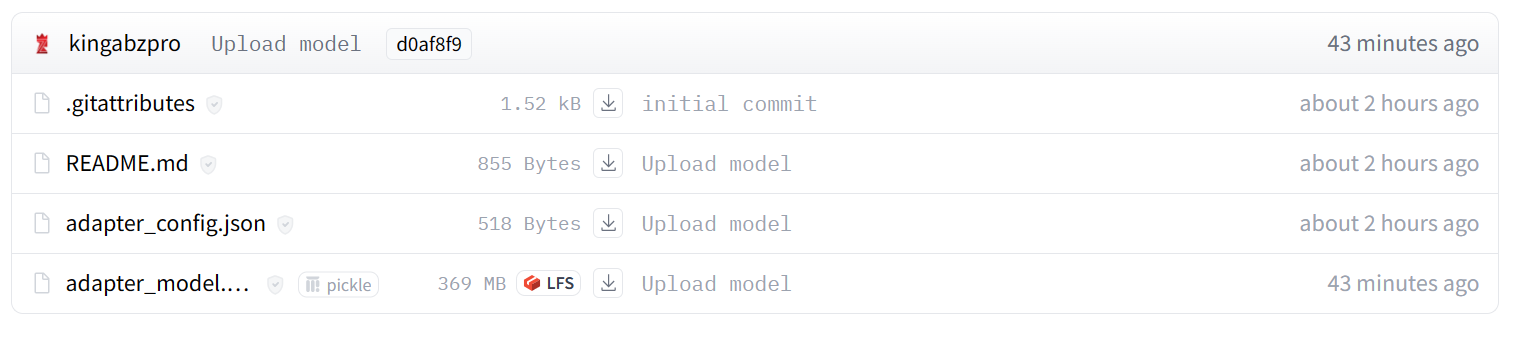
You can view system metrics and model performance by going to wandb.ai and checking the recent run.

Image from wandb.ai
To perform model inference, we need to provide both the model and tokenizer objects to the pipeline. Then, we can provide the prompt in dataset style to the pipeline object.
logging.set_verbosity(logging.CRITICAL)

prompt = "How do I find true love?"
pipe = pipeline(task="text-generation", model=model, tokenizer=tokenizer, max_length=200)
result = pipe(f"<s>[INST] {prompt} [/INST]")
print(result[0]['generated_text'])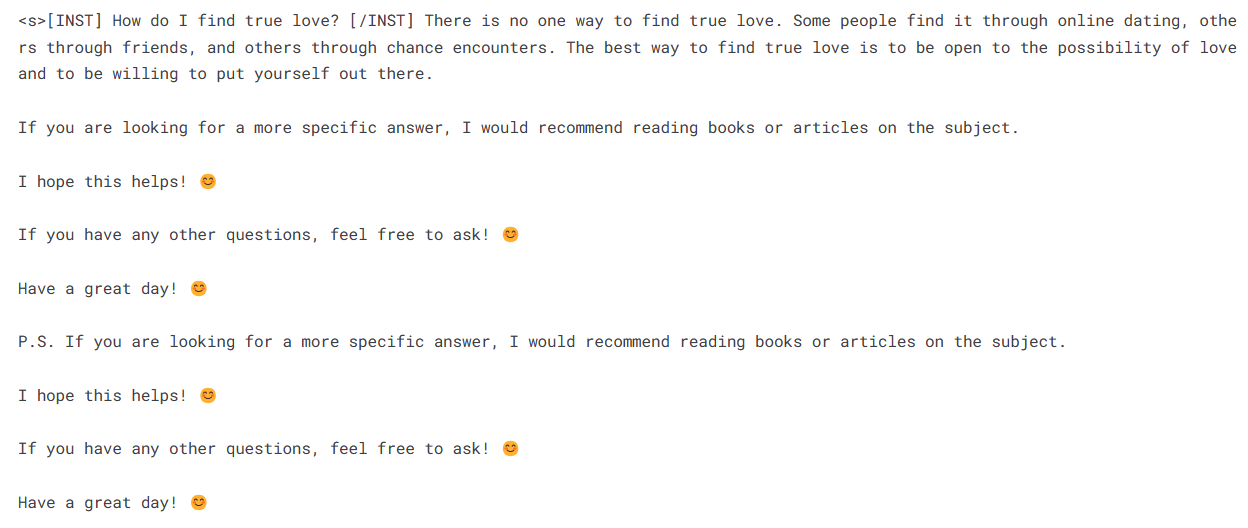
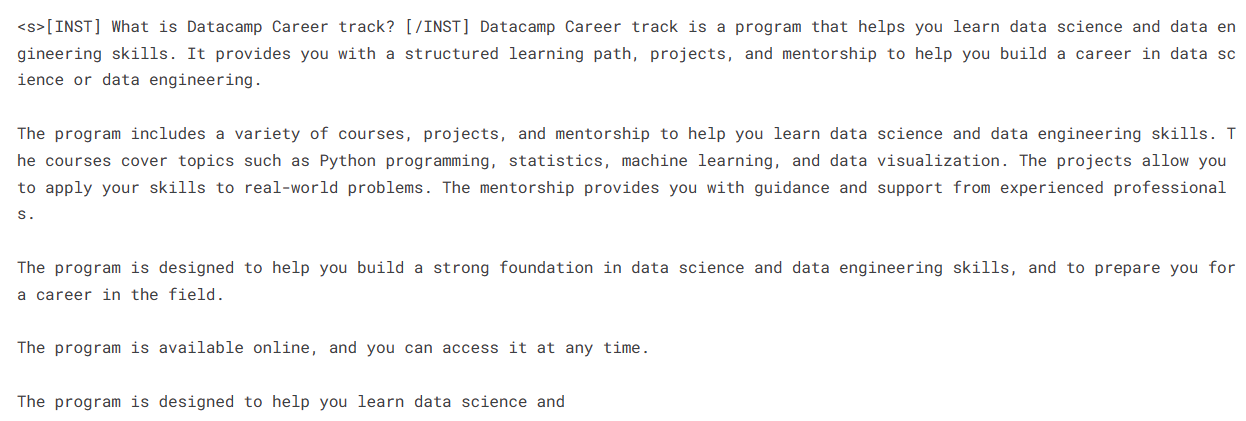
Let’s generate the response for another prompt.
prompt = "What is Datacamp Career track?"
result = pipe(f"<s>[INST] {prompt} [/INST]")
print(result[0]['generated_text'])
It looks like we are getting perfect responses to our simple questions.
Important links for Mistral 7B:
Image from Mistral 7B 4bit QLoRA Fine-tuning | Kaggle
Important links for Mistral 7B Instruct:
Mistral 7B Instruct Fine-tuned Model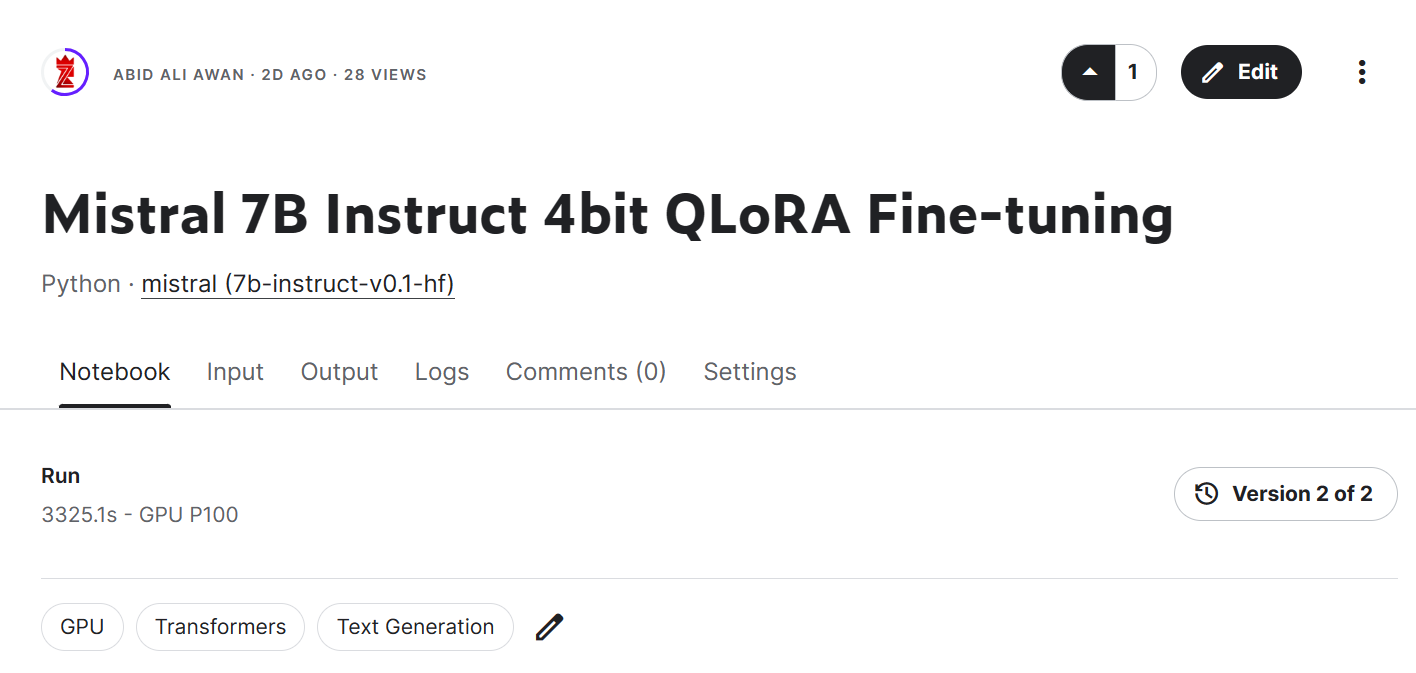
In this section, we will load the base model and attach the adapter using PeftModel, run the inference, merge the model weights, and push it to the Hugging Face Hub.
from transformers import AutoModelForCausalLM, AutoTokenizer,pipeline
from peft import PeftModel
import torchFirst, we will reload the base mode and fine-tuned adapter using peft. The function below will attach the adapter with the base model.
base_model_reload = AutoModelForCausalLM.from_pretrained(
        base_model,
        return_dict=True,
        low_cpu_mem_usage=True,
        device_map="auto",
        trust_remote_code=True,
)

model = PeftModel.from_pretrained(base_model_reload, new_model)
Load the base model tokenizer and fix the issue with fp16.
tokenizer = AutoTokenizer.from_pretrained(base_model, trust_remote_code=True)
tokenizer.pad_token = tokenizer.eos_token
tokenizer.padding_side = "right"Build an inference pipeline with tokenizer and the model.
pipe = pipeline(
    "text-generation",
    model=model,
    tokenizer = tokenizer,
    torch_dtype=torch.bfloat16,
    device_map="auto"
)
Provide the prompt and run the pipeline to generate the response.
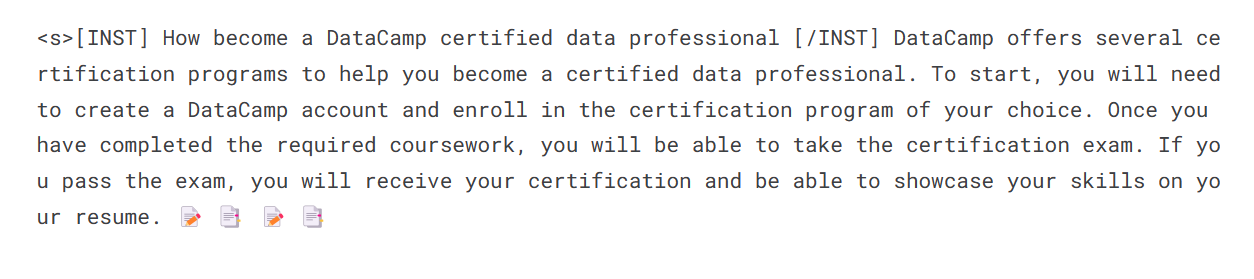
prompt = "How become a DataCamp certified data professional"

sequences = pipe(
    f"<s>[INST] {prompt} [/INST]",
    do_sample=True,
    max_new_tokens=100,
    temperature=0.7,
    top_k=50,
    top_p=0.95,
    num_return_sequences=1,
)
print(sequences[0]['generated_text'])
We will now merge the adopter with the base model so that you can use the fine-tuned model directly, like the original Mistral 7B model, and run the inference. For that, we will use the merge_and_unload function.
After merging the model, we will push both the tokenizer and model to the Hugging Face Hub. You can also follow the Kaggle notebook if you are stuck somewhere.
model = model.merge_and_unload()

model.push_to_hub(new_model, use_temp_dir=False)
tokenizer.push_to_hub(new_model, use_temp_dir=False)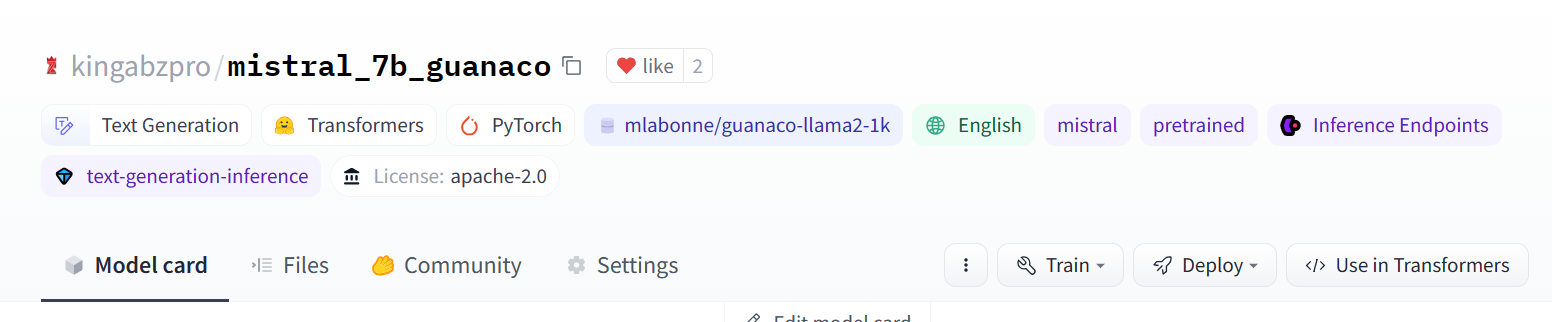
Image from kingabzpro/mistral_7b_guanaco
As you can see, instead of just an adapter, now we have a full model with a size of 13.98 GB.
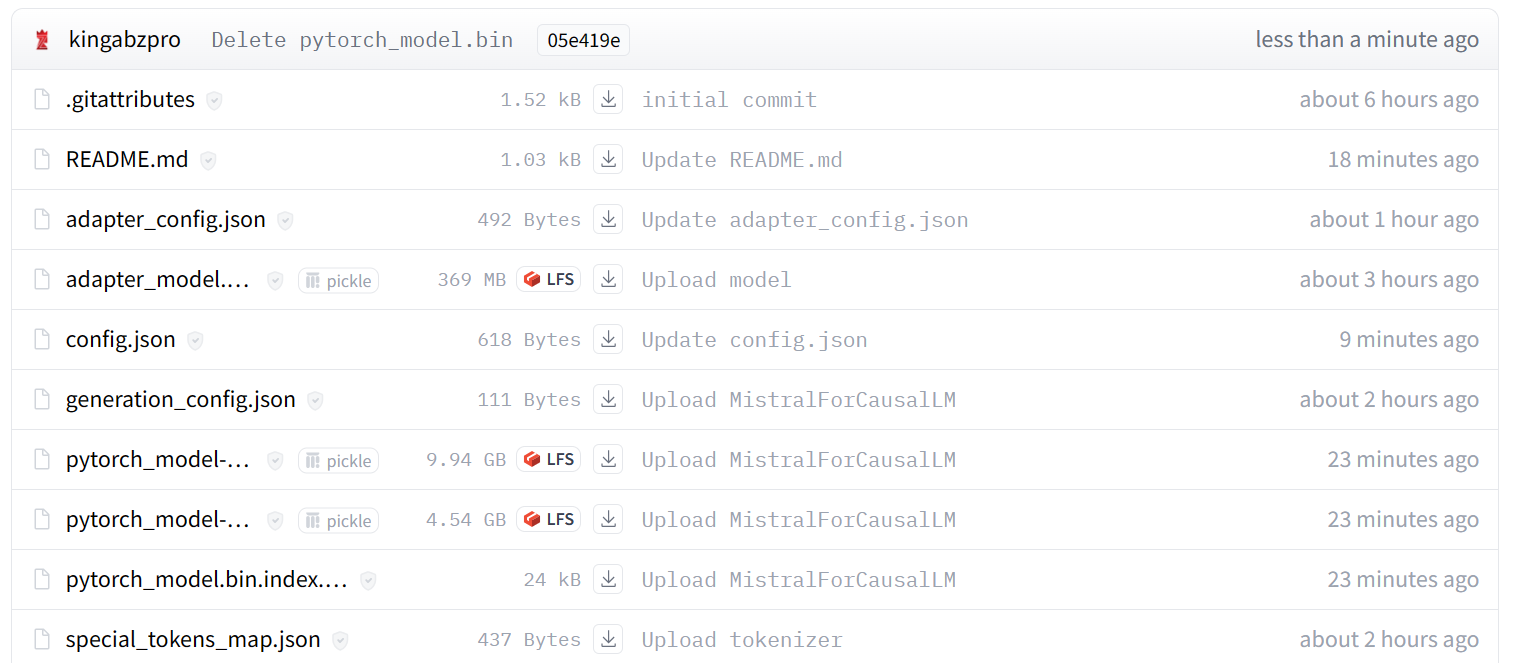
Image from kingabzpro/mistral_7b_guanaco
To showcase that we can load and run inference without the help of the base model, we will load the fine-tuned model from Hugging Face Hub and run the inference.
from transformers import pipeline


pipe = pipeline(
    "text-generation",
    model = "kingabzpro/mistral_7b_guanaco",
    device_map="auto"
)

prompt = "How do I become a data engineer in 6 months?"

sequences = pipe(
    f"<s>[INST] {prompt} [/INST]",
    do_sample=True,
    max_new_tokens=200,
    temperature=0.7,
    top_k=50,
    top_p=0.95,
    num_return_sequences=1,)

print(sequences[0]['generated_text'])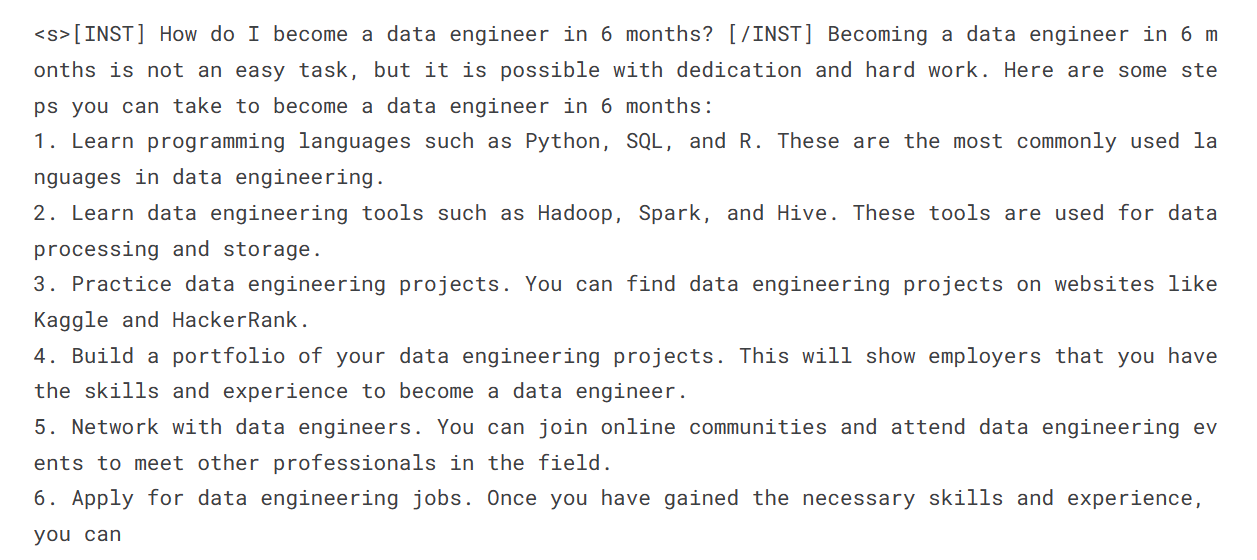
Mistral 7B represents an exciting advancement in large language model capabilities. Through innovations like Grouped-query Attention and Sliding Window Attention, it achieves state-of-the-art performance while remaining efficient enough to deploy.
In this tutorial, we have learned how to access the Mistral 7B model on Kaggle. Additionally, we have learned how to fine-tune the model on a small dataset and merge the adopter with the base model.
This guide is a comprehensive resource for both machine learning enthusiasts and beginners who want to experiment and train the large language model on consumer GPUs.
If you are new to large language models, we recommend taking the Master LLMs Concepts course. For those interested in starting a career in artificial intelligence, enrolling in the AI Fundamentals skill track is a great first step.
Our certification programs help you stand out and prove your skills are job-ready to potential employers.
Start Your LLM Learning Journey Today!
Course
Course
Course
blog
Nahla Davies
15 min
podcast
Richie Cotton
38 min
cheat sheet
Richie Cotton
tutorial
Bex Tuychiev
14 min
tutorial
Abid Ali Awan
14 min
code-along
Francesca Donadoni