
course
Introduction to SQL
2 hours
661.7K
MySQL is the single most popular relational database tool, with a market share of over 40%. Compared to its competitors, PostgreSQL (16%) and Oracle Database (11%), its numbers look very good.
MySQL is popular because it is simple yet powerful. Here are its best features:
As for using MySQL inside Docker containers, well, that’s just a match made in the clouds. If you have worked with Docker before, all its benefits apply to MySQL docker containers, too:
Most importantly of all, your MySQL application will work anywhere, not just on your computer.
So, today, you will learn the fundamentals of running MySQL in tandem with Docker. Let’s get started!
As this article focuses on MySQL Docker containers, it has a few prerequisites to follow along:

and the docker --help command works without errors on the terminal.
We will start by downloading the official MySQL Docker image with the following command:
$ docker pull mysql:latestdocker pull requires the name and the version of the image with image:version syntax. Using the keyword latest downloads the most recent stable release.
If you visit the official MySQL image page on Docker Hub, you can see many other versions for different purposes.
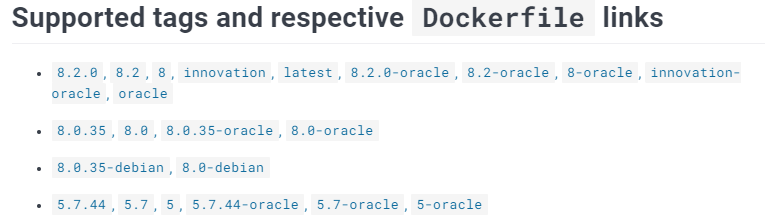
Here is how to download v8.2, as an example:
$ docker pull mysql:8.2Once you download the image, it should be listed among your existing Docker images:
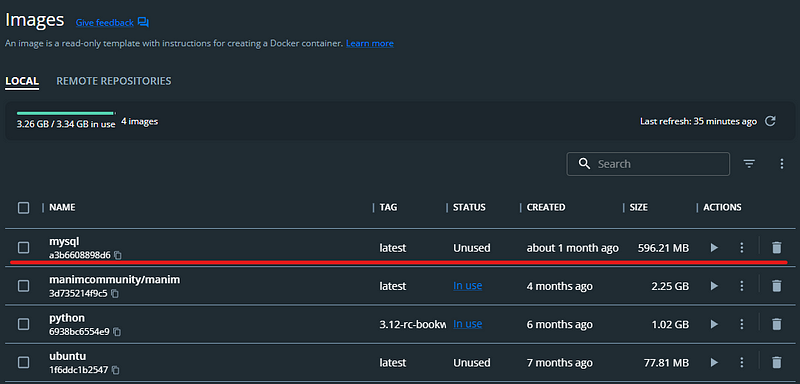
Listing Docker images is possible through the terminal, as well:
$ docker images
Remember: Docker images are blueprints for building containers. Just like a blueprint allows you to build a house, a Docker image contains all the necessary instructions and components to create a running instance of an application or service.
If you come from an OOP background, think of Docker images as classes. Just like creating a single class allows you to create multiple objects, Docker images allow you to create multiple containers off of them.
Now, let’s create our first container from the mysql image. Here is the command we will use:
$ docker run --name test-mysql -e MYSQL_ROOT_PASSWORD=strong_password -d mysql
run: creates a new container or starts an existing one--name CONTAINER_NAME: gives the container a name. The name should be readable and short. In our case, the name is test-mysql.-e ENV_VARIABLE=value: the -e tag creates an environment variable that will be accessible within the container. It is crucial to set MYSQL_ROOT_PASSWORD so that we can run SQL commands later from the container. Make sure to store your strong password somewhere safe (not your brain).-d: short for detached, the -d tag makes the container run in the background. If you remove this tag, the command will keep printing logs until the container stops.image_name: the final argument is the image name the container will be built from. In this case, our image is mysql.If the command returns a long string of gibberish (the container ID), it means the container has started. You can check its status with docker ps:

Remember: a Docker container is a powerful emulator of an operating system. Apart from running MySQL, you can do any task you would normally do with your computer’s terminal from within the container.
To access the terminal inside your container, you can use the following command:
$ docker exec -it container_name bashThis will launch a bash session.
All MySQL containers launch a MySQL server that includes everything to create and manage databases using SQL. To connect to the server, containers also come with a MySQL client that lets us run SQL queries. The client is just a fancy name for the mysql terminal command. Let’s use it inside test-mysql’s terminal:
1. Open the bash terminal of test-mysql:
$ docker exec -it test-mysql bash2. Connect to the client as a root user:
$ mysql -u root -p
Enter password: ...
mysql>
We are using the -u tag to specify the username (root) and adding the -p tag to enter the password when prompted.
It is possible to connect to the MySQL server outside the container, as well. For example, to connect from your host machine, you can install the MySQL client manually in your system.
To install MySQL and its client on Windows, you can follow the instructions from the official MySQL installation guide.
For Mac, you can use Homebrew:
$ brew install mysqlFor Linux or WSL2 (my choice), you can use sudo:
$ sudo apt update
$ sudo apt install mysql-client
After installation, if you are running the container, stop and remove it:
$ docker stop test-mysql
test-mysql
$ docker rm test-mysql
Next, we will restart the container by mapping a port from the container to a port on our local machine:
$ docker run -d --name test-mysql -e MYSQL_ROOT_PASSWORD=strong_password -p 3307:3306 mysqlThis command does the following:
-p 3307:3306: Maps the container's port 3306 (the default port for MySQL) to your local port 3307. This means any traffic sent to your local port 3307 will be forwarded to the container's port 3306 and your MySQL server will be accessible on that port.-d: Runs the container in detached mode again.--name test-mysql: Reuses the same container name "test-mysql".-e MYSQL_ROOT_PASSWORD=strong_password: Sets the root password again for the MySQL server.mysql: Specifies the Docker image to run, which is the official MySQL image.After terminal outputs a new ID for the container, we can check the port mappings:
$ docker port test-mysql
3306/tcp -> 0.0.0.0:3307
It was successful! Now, from your local machine, you can connect to the server on port 3307 using mysql client:
$ mysql --host=127.0.0.1 --port=3307 -u root -p
Enter password:

Welcome to the MySQL monitor.  Commands end with ; or \g.
Your MySQL connection id is 8
Server version: 8.2.0 MySQL Community Server - GPL

Copyright (c) 2000, 2023, Oracle and/or its affiliates…
You can configure MySQL containers for so many settings using a configuration file. Usually, the file will be stored inside one of the following directories of the container:
/etc/mysql//etc/mysql/conf.d/etc/mysql/mysql.conf.dThe directories change from image to image. But the standard file name and extension for a config file is my.cnf. If the file doesn't exist in any of the directories listed above, this means the container requires a custom configuration file. This is the case for our test-mysql container:
$ ls /etc/mysql/conf.d/ # Returns no outputIn situations like these, we have to take the following careful steps:
1. Stop and remove the container:
$ docker stop test-mysql; docker rm test-mysql
2. Create an empty configuration file locally (on your machine):
$ sudo mkdir -p /etc/docker/test-mysql # Create a dir
$ sudo touch /etc/docker/test-mysql/my.cnf # Create a config file inside dir
3. Restart the container by linking the two empty .cnf files:
$ docker run \
   --name test-mysql \
   -v /etc/docker/test-mysql:/etc/mysql/conf.d \
   -e MYSQL_ROOT_PASSWORD=strong_password \
   -d mysql
We are writing a new tag: -v which is short for volume. The tag can be used to link directories between the container and the local machine. In computer science lingo, this process is called mounting.
So, in the command above, we are mounting the local /etc/docker/test-mysql directory to the container's /etc/mysql/conf.d directory. This will link the contents of both directories. Any changes made in either directories will be reflected in both.
Mounting allows us to edit the my.cnf file on our local machine to change the configurations of Docker containers. And the best part is that the modified configurations will persist in our local machine even after the container is stopped or removed. It will be reusable.
So, after this step, what kind of configurations can we change? The answer depends on your use case. We will cover them below.
While the default configuration for MySQL Docker containers works for many common scenarios, you should modify certain settings to optimize performance, security, and resource usage. Here are some of the most commonly changed configuration options:
To see the full list of configuration options, you can run the following command:
$ docker run -it --rm mysql:tag --verbose --helpYou can edit the .cnf file with any text editor. Here is the syntax you should follow:
[mysqld]
max_connections=200
other_params=value
...
Persisting data stored in your MySQL containers is crucial for many reasons:
The process is the one we’ve already seen — we are going to create a volume and mount it to where the data is stored in our container. Here are the steps:
1. Create a volume:
$ docker volume create test-mysql-dataThe volume create command creates a dedicated storage on your local file system for the volume. After the volume is mounted, all container data will be linked to it.
2. Restart the container with the volume mounted:
$ docker stop test-mysql; docker rm test-mysql
$ docker run \
   --name test-mysql \
   -v test-mysql-data:/var/lib/mysql \
   -e MYSQL_ROOT_PASSWORD=strong_password \
   -d mysql
This time, the syntax is in this format: -v volume_name:directory_in_container. All created volumes should be mounted on /var/lib/mysql directory as specified in MySQL image docs.
So, now, any databases or tables created inside test-mysql will be persisted locally, even after the container is stopped or removed.
Throughout the article, our docker run command has evolved significantly. So, let's put together all its variations into one, final master command. We have to stop and remove the container again. We will remove the volume as well to start from scratch:
$ docker stop test-mysql; docker rm test-mysql
$ docker volume rm test-mysql-data
So, here is the final master command:
$ docker run \
   --name final-mysql \
   -e MYSQL_ROOT_PASSWORD=strong_password \
   -p 3307:3306 \
   -v /etc/docker/test-mysql:/etc/mysql/conf.d \
   -v final-mysql-data:/var/lib/mysql \
   -d mysql
This command mounts our previous my.cnf local file to the desired location as well as create a new volume named final-mysql-data and mount it.
This article has covered essential aspects of running and managing MySQL databases inside Docker containers. We have learned how to download and set up MySQL images, start MySQL servers inside containers, how to modify those containers and add volumes for custom configuration and data persistence.
To learn more about the topic, I recommend the following resources:
Thank you for reading!
Start Your Learning Journey Today!
course
course
cheat sheet
Richie Cotton
5 min
tutorial
Arunn Thevapalan
15 min
tutorial
Kurtis Pykes
13 min
tutorial
Javier Canales Luna
15 min
tutorial
Bex Tuychiev
10 min
tutorial
DataCamp Team
3 min